 Emasculated tomato flower (in this case Tangella) with the anther cone removed, leaving just the outer ring of petals and the central pistil.
What more exciting project could a gardener wish for than to breed your own unique tomatoes? Many of the heirloom varieties and some of the long-standing catalogue favourites were originally bred by curious amateurs. And why not? All you need is a bit of patience and the easily learned skill of hand-pollination.
As with most things in the garden, there's a "proper" way to do it and an "oh sod it that'll do" way. I admit I tend towards the latter. So the method described here is slightly less complicated than some of the other pollination guides I've found on the net. But it really doesn't need to be complicated if you're doing it on a garden scale rather than a commercial one.
Compared with peas, hand-pollinating tomatoes is quite simple. The flower structure is very basic. But there are a couple of practical issues which make it less easy: the flowers are smaller, so you need good eyesight and/or a magnifying glass to see what you're doing, and the pistil is fragile and easily damaged. Unlike peas, where the pistil is quite bendy and robust, tomato pistils easily snap off or get kinked. So don't feel bad if you ruin a few flowers before you get the hang of it. The plants won't mind ... they'll just produce new ones.
Hybridising tomatoes is a two stage process: emasculation (removing the male bits) and pollination (introducing male bits from a different variety).
Tomato flowers have a layer of petals which open out fully when the flower matures, and a yellow cone in the centre which is formed from the anthers (pollen sacs) which are fused together. Inside the cone is the pistil: the long green stalk which carries the all important stigma at its tip. The norm for tomatoes is perfect self-pollination. Pollen is shed on the inside of the cone and falls straight onto the stigma. There are no bees needed, and the stigma may never be exposed to the outside world. To hand-pollinate a tomato flower, you need to stop this from happening by removing the anthers before they shed pollen.
 These two buds both make good pollination candidates, subject to the variety and weather. The open flower on the right is at a good stage for pollen collection.
In an ideal world you would do your pollinations on the first few trusses that form on the plant, and use the first buds on each cyme. But any good-sized healthy bud will do the job. The important thing is to identify them at the right stage. Tomatoes normally self-pollinate at around the time when the petals open, so choose buds which are just starting to colour up, with the sepals (but not the petals) just opening. The exact time will depend on the weather, because they are reluctant to shed pollen if it's cool or wet but begin shedding it rapidly when the sun comes out. It's best to do the emasculation when the weather is cool and overcast.
My tool for tomato pollination is my artist's scalpel (and a cheapie one at that). People who do this commercially use pointy-tipped forceps, but most gardeners don't have things like that lying around in their sheds. Any small blade will do, as long as you clean it each time you poke it into a flower. I just wipe it on whatever I've got handy (my clothing has been known) and nip into the house to wash my hands before moving on to a plant of a different variety. As long as you're conscious of the risk of contaminating your hybrids with stray pollen and take reasonable care not to, you shouldn't have a problem.
 Use the scalpel to prise the segments of anther cone open
Having selected your bud, open out the petals to reveal the cone inside. The petals usually open quite readily and stay out of the way. Using the tip of the scalpel blade, prise the tip of the anther cone open just far enough that you can grab a segment of it with your fingernails, then peel it down to the bottom and pull it off. Remove all the segments so that you're left with just the long green pistil in the centre (see below).
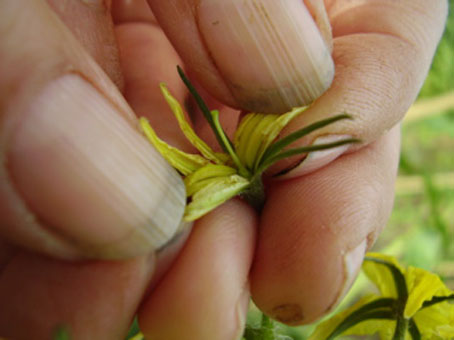 Open the anther cone completely and pull off all the segments so that you're left with the green pistil (notice the bobbly stigma at its tip). Eww, look at the state of my fingertips. That's what playing the mandolin does for you. Like strumming a cheesegrater.
You can use the scalpel to remove the segments of anther if you prefer, but try not to poke it into the anther itself or it may spill some pollen. The aim is to remove the anthers without breaking them so that no pollen is shed. You should also have a look at them to make sure they aren't already shedding any; if you can see traces of yellowish-white dust then it's too late to do the cross and you'll have to try again with a slightly younger bud (or on a day when the weather is cooler and damper).
The other thing you will have to watch for is not to damage the pistil. In some varieties, especially older ones, the stigma is flush with or actually sticking out from the anther cone. In other cases the pistil is very small and thin and tightly snuggled within the anthers. Either way you will have to take care not to rip it off along with the anther segments. You will get better at this with practice but will probably end up ruining the occasional flower no matter how many times you do it!
OK, so that's the mother bud sorted out. The stigma is normally receptive a day or so before any pollen is shed, so in most cases you can get on and do the second stage of the process (pollination) straight away. The stigma tends to go somewhat bobbly and blobby when it's receptive, but it's more apparent in some varieties than others. It should certainly be free of any obvious traces of pollen. Once you've done a few pollinations you'll learn to see when the stigma is clean and receptive. Some tomato breeders leave the pollination until the next day to give the stigma more time to mature, others just get on with it. Better still, if you have the patience, is to do both. I've found that carrying out the pollination two or three times on different days increases the chances of it taking successfully.
Now you need to collect some pollen from the plant you're using as the other parent. For this you'll need to find a flower that's recently opened and pull off a segment of the anther cone. The anthers take the form of plump yellow sacs, which split along the seams when they're ripe so that the pollen is sprinkled out through fine slits. It's not always very abundant though, and it's also very fine and easily blows away! Most ripe flowers will usually have some pollen to spare though. The easiest way to collect it is to scrape the blade along the length of the anther a couple of times in one direction. It's quite a pale coloured pollen, and exceptionally long lived. Sometimes there's a small 'pool' of pollen towards the tip of the cone if it's already been shed. If it hasn't been shed yet you may have to extract some from the sac itself by slitting it open and scraping out the contents onto the scalpel blade.
Then take the pollen-laden scalpel to the mother plant (watch the pollen doesn't blow away en route) and dab it very lightly and gently on the stigma. If the stigma is a reasonable size and/or you use a magnifying lens you should be able to see the grains of pollen clinging to it.
And that's about it really. The flower may look a bit silly, being just a stigma in the middle of a ring of petals, but it generally doesn't need to be taped shut or protected with anything. The risk of contamination with stray pollen is low, since there's nothing to attract any insects to it, and there shouldn't be any problem with the stigma drying out as long as the weather is not too hot and dry. So you can just leave it to get on with it, and it's readily accessible if you want to give it a second dose of pollen the following day.
Sometimes when you try to pull the anthers off a mature flower to collect the pollen the entire flower face comes off – petals, anthers, the works – leaving behind only the pistil. You can often use the whole thing just as it is by placing it over the pistil of the emasculated mother bud. A kind of flower transplant. It only really works if the two plants have flowers of a similar size, and you may also need to tie a piece of cotton thread or wrap a tube of masking tape around it to hold it in place. My experience is that it's quite an effective way to get good pollination, but I'm much more likely to snap the pistil off in the process ... and that means starting all over again.
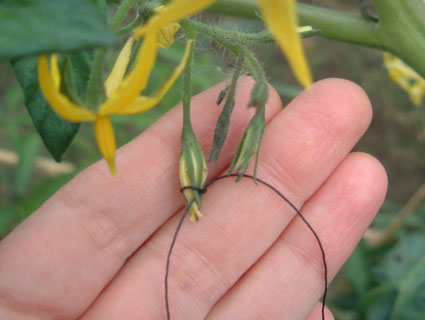 Pollinated bud clamped shut by tying a cotton thread around it in a single knot, not too tight. You don't need to do this unless you're trying to hold a "flower transplant" in place, or it's very hot and dry and you're worried about the stigma getting dessicated.
After pollination you have to wait for several days before you can see whether it's worked (unless the bud falls off, which is a pretty unambiguous negative). With a bit of luck you'll start to see some swelling at the base of the pistil and before you know it there's a tiddly green tomato emerging. You will almost certainly find that not all your efforts are successful. This is normal. Hand-pollination is rarely 100% effective, and it's best to do several buds to allow for some failures.
One thing I haven't mentioned is how to choose which tomatoes to hybridise. To some extent that's part of the fun. You can design your own ideal tomato by deciding which characteristics you'd like and breeding together two varieties which most closely bring together the traits you want. Or you can just hybridise whatever you happen to have flowering in the garden and see what you end up with.
If you want to breed a new variety which you can select from and continue to grow in the future, you'll need to start with open-pollinated varieties (i.e. ones that come true from seed). Most tomatoes are ... just avoid any that are already F1 hybrids. The seed you produce from your cross will be a new F1 hybrid, and all the plants from it will be very uniform. When you allow that generation of plants to self-pollinate you will get F2 hybrid seed, whose plants will show a range of different characteristics as the mixed up genes of the two original parents start to separate out. At that stage you can select the characteristics you want for your new variety.
How long it takes to create a new true-breeding variety depends on the genes involved, whether they're dominant or recessive and various other factors, but tomatoes are easier than most because they can be inbred without any ill effects. So breeding a new variety could be as simple as finding something you like in the F2 generation and allowing it to self-pollinate. In other cases you may get some variation in the offspring and have to 'rogue out' any off-types for a few more generations to stabilise your new variety.
If you choose one or more F1 hybrid varieties as parents for your hand-pollination you will end up with all sorts of unpredictable weirdness. That doesn't mean you shouldn't do it, but you should be aware that it's the genetic equivalent of chucking everything into a big melting pot. F1 hybrids are not true-breeding and the seeds you get from your pollination will have all sorts of segregations of different genes combining with more different genes from the other parent. You could end up with pretty much anything!
(With thanks to my friend Caroline for helping me with the photographs.)
8 comments:
You are so patient! Ready to see if your f2s are interesting, and then to wait longer still to see if they breed true....
Guess that's one reason I like programming computers -- I get to see my result NOW!!!!
:-)
I'm glad I get to read about what you are doing. Once upon a time I had a tomato that volunteered every year in my garden. At least I think it was the same one.... Fruits about the size that would fit into the circle of your thumb and index finger. They were fine, but I don't think especially distinguished..... I did like my fuzzy flat beans, though. Bummer that the neighbor's tree shaded my garden out of existence.....
Wow!
I grew tomatoes for the first time this year!
This totally blew me away!
Wow!
Dx
Thanks so much for posting this :) It's been tremendously helpful with my Biology AS work which involves crossing tomatoes! thanks bundles :)
hey im gonna try and do this in my own garden this year. the only thing i dont understand is if you dont cover the flowers you pollinated yourself. How can you be sure they dont also get pollinated by other tomatoe plants in the garden or even by itself from another of its flowers you didnt remove anthers from?
Hi Jeff
There's not much risk of cross-pollination because the pollen normally stays inside the anther cone of each flower, and doesn't get spread around by wind or insects. Tomato flowers are very self-contained and will normally only pollinate themselves.
If you're worried about it though you can always cover the exposed parts with a circle of tape or a small paper bag.
Been wanting to try this in my garden,This made it sound very simple,Thanks.........P.S. Started my own blog today and joined yours.Also bought your cd.For some reason when i looked at your picture i thought to myself,I KNOW HER,Of course i can`t living soo far away,But my family did originally come fromover there.Always wanted to take a vacation over in england,But it costs so much.We suposably came from Chedgly Summerset England.Anyhow,Got to go,Take Care
Pappabell
just a tad more photos of whats going on there would be great.
Once the anther is removed from your (now) emasculated flower the bees and insects are no longer attracted to it so there’s no chance of any contamination by outside sources. Hope this helps :)
Post a Comment