Showing posts with label Hand pollination. Show all posts
Showing posts with label Hand pollination. Show all posts
Thursday, 1 July 2010
Hybridising peas: the video
Here's a demonstration of the method of hand pollinating peas for anyone who has 10 minutes and 39 seconds to spare. Sorry about the business with the cat, he distracted me and it wasn't really possible to edit it.

Sunday, 27 June 2010
How to breed your own potatoes
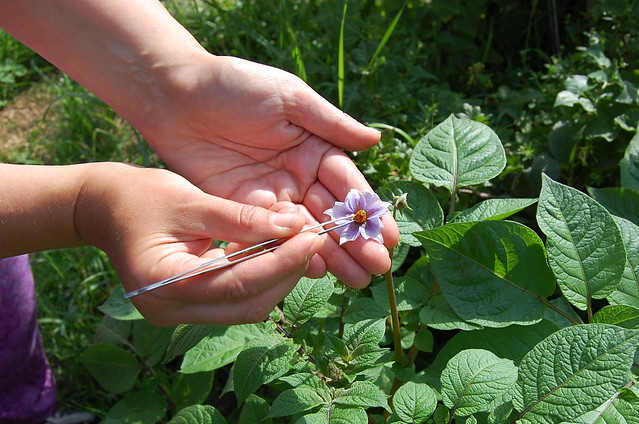
Breeding new potato varieties is easy. You can hand-pollinate potato flowers in far less time than it'll take you to read this article, but I'm going to attempt a reasonably thorough explanation, so I hope you find it helpful.
Potato breeding is done through sexual reproduction, i.e. pollinating flowers to produce berries which contain true seeds (TPS). Normally when you plant potatoes you propagate them from tubers, confusingly called seed potatoes but which are not actually seeds, but root cuttings. You can't cross tubers. They can only reproduce themselves as they are. Occasionally a plant may produce a spontaneous mutation but it doesn't happen often enough to be useful as a breeding method. Flowers are the way to go, because they give you the option to combine and reshuffle genes from the parent varieties of your choice.
There's a lot to be grateful for in the anatomy of a potato flower. Hand-pollinating them is very easy. The flowers are large and easy to work with, and the individual parts are easy to manipulate.
What's not so easy is making careful plans and predictions for what you might get out of it, and that's because potatoes are tetraploid. If you've no idea what I'm talking about then have a look at my previous post about TPS for a simplified explanation. To give a one-sentence summary: a tetraploid has double the amount of genetic material that a normal (diploid) organism has, which is a bit like inheriting traits from four parents rather than two. Tetraploids are a quirk of nature but in potatoes they are a very successful one, and the vast majority of cultivated potatoes in Europe and North America are tetraploid.
You may still come across the occasional diploid. Mayan Gold and its associated varieties are diploid, and those who are growing TPS from Tom Wagner may have a few diploid lines from him. Diploid potatoes can be recognised by a tendency to have smaller and less fleshy leaves, but the most distinctive feature is the berry. A diploid potato berry has a distinctively pointed end, kind of strawberry shaped, while tetraploid berries are more rounded and tomato-like. If you're feeling experimental you can try crossing a diploid with a tetraploid. At best you will only get a few viable seeds out of it, but it's a brilliant way of introducing new diversity into potatoes. At some point soon I will give it a whole article of its own, as it's too elaborate a subject to go into here.
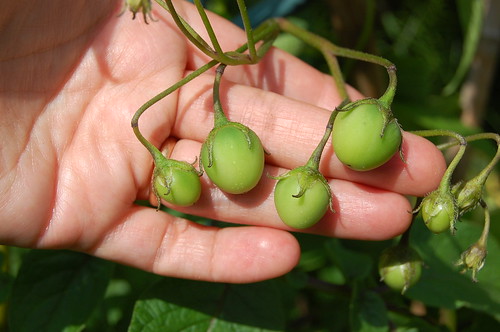
Potato berries (these are tetraploid ones) in development.
However, assuming the potatoes you want to cross are tetraploid, since most of them are, it's very difficult to predict what the resulting offspring will be like because of the genetic variability involved. With tetraploids, the convenient order of the Mendelian ratio is thrown out the window and replaced by something more akin to a gene tombola. F1 hybrids are not uniform as they are in most other types of breeding project. If you grew a lot of offspring from your cross you'd find that many traits show continuous degrees of variation through the population, rather than segregating into Mendel's either/or groups … which happens because there are so many different ways the alleles can arrange themselves. To quote a research paper by Scotland's premier spudmeisters, Meyer et al (1998) "[Tetraploid] inheritance implies the random pairing of four homologous chromosomes at meiosis, and in a highly heterozygous outbreeding species results in a large number of possible allelic combinations at a single locus. In the most extreme case, eight different alleles could segregate independently in a population, resulting in 36 possible genotypic classes in the progeny." In other words, potatoes naturally have a mixed up genepool (from outbreeding) and when they pollinate and set seed those alleles can arrange themselves in any order - with each different combination having a unique effect on how that trait is expressed. And we're just talking about an individual locus here … the same is happening at every other locus throughout the whole genome. Yowza!
In short, tetraploids are complex and contain a lot of genetic material which can be immensely variable. Scientists doing genetic research on potatoes often choose to work with diploid lines instead, because tetraploids make such a muddle of their data it's hard to interpret anything.
So where does that leave you as a home gardener or small-scale farmer wanting to develop your own potato varieties? It leaves you in a position where you may as well have fun, experiment, use your imagination, be creative. As the results can't easily be predicted, you don't actually need to know anything about genetics. Think more along the lines of what you might get if you cross this colour with that colour, or this flavour with that shape - and then be prepared to be surprised!
One piece of misinformation I see spread all over the internet is a belief that you won't get anything worthwhile out of a home-made potato hybrid because producing just one good variety takes thousands of plants and many many years. This myth has arisen from under the slow-grinding wheels of the potato industry, which does work like that. Sure, if you want to breed a variety which will be listed in all the catalogues and sold in Tesco's and will make you rich from the royalties, your chances are very slim. The selection criteria for commercial potato varieties are immensely restrictive - and largely at odds with what most gardeners would want. Commercial breeders may well churn through (and reject) 200,000 seedlings to find one with commercial potential, then spend the next eight years doing field trials with it before it's ready for release. But don't let that put you off. You can breed a good variety within two years - easily. The majority of your home-made potatoes will be worthwhile, at least decent enough to eat and enjoy and feel proud of. A few will be exciting and wonderful. Even if you're only working with a very small patch of garden, you will almost certainly get some tubers that are worth saving and growing on next year.
The beautiful thing about potatoes is that it only takes two seasons to get a completely stable new variety. So it's actually quicker than most other vegetables. You make a pollination the first year and produce the F1 seeds, which are all unique individuals because of the genetic diversity. The second year you grow plants from those seeds and they make tubers. If you like the tubers, you simply propagate them by saving and replanting them. As the tubers are basically root cuttings of the parent plant (clones) they are genetically identical. There's no arsing about trying to make F2 and F3 hybrids (unless you want to) or years spent roguing out unwanted recessives. Once you've got something interesting, it's instantly a new variety.
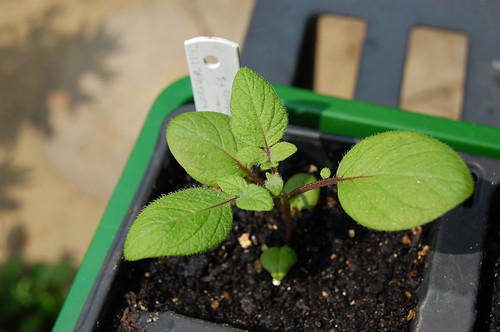
Hybrid potato grown from TPS. This is one of Tom Wagner's hybrids, an F3 of Pirampo x Khuchi Akita. The parent varieties are Bolivian landraces, and are diploid.
If you've dipped a toe into plant breeding before, you'll know that plants tend to be either inbreeders or outbreeders - though that's more of a sliding scale than a polar absolute. Potatoes are really a bit of both. The natural status of potato is outbreeder. The various (diploid) landrace species from which cultivated potatoes are derived have a self-incompatibility mechanism which prevents them from pollinating themselves. The majority of diploid varieties are self-incompatible, although there are exceptions. This forces them to hybridise and mix their genes up in every generation, hence the wondrous diversity found among diploid landraces. However, when potatoes went tetraploid the compatibility barrier got screwed up somewhat. Many tetraploid potatoes have sterile pollen which can't fertilise anything at all, but others can fertilise themselves as well as each other. So they're designed to be outbreeders, but in practice a lot of flowers simply get knocked up by their own pollen.
Which gives you a choice: you can make hybrid seeds by crossing two different varieties, or you can make self-pollinated seeds which are the product of just that one variety.
Choosing parents: hybrid or OP?
Both are worth experimenting with, but for different reasons.
When a potato plant sets berries naturally without your intervention, it's most likely that it self-pollinated, but it may also have made hybrids with other potatoes flowering nearby, and you may have a mixture of selfed and hybrid seeds in the same berry. This is called open pollination (OP) … and the results are basically pot luck.
Making a deliberate hybrid is the most usual way to breed a new variety, as it introduces a lot more diversity. The basic method is to emasculate the flower to stop it from pollinating itself (which you don't even need to do if it's one of the many varieties with sterile pollen) and fertilise the female part of the flower with some pollen from a different variety. The offspring will be very varied, but that's the fun part and you should also get some hybrid vigour which makes for healthy and abundant plants. The only problem with this is that so many varieties of potato are poor berry setters, so not all varieties can be hybridised.
If you want to grow seeds from one specific variety it can be as simple as saving naturally pollinated berries from it, but if you want to be sure of getting self-pollinated seeds, it's easy enough to do (as long as it's one of the fertile varieties). Just dab a flower with pollen scraped from its own anthers, or other flowers on the same plant, or from other plants of the same variety. Bear in mind though that you will not get a true-breeding offspring of the parent variety by doing so. As potatoes are very heterozygous and have four lots of genetic material to throw around with cheerful abandon, even when they're self-pollinated they segregate into many different phenotypes. If you grow self-pollinated seed from Salad Blue, for example, you will not end up with a lot of spuds which look like Salad Blue. You will get varying shades of blue flesh, some much lighter than the original, some darker, and a few with pinky skin. If you grow selfed seeds from Congo, another blue variety, you may end up with a baffling range of purples, pinks and pure snowy whites, with considerable variation in tuber shape. What's happening is that all the genetic material which has been funnelled into the variety from various ancestors is segregating. Recessive traits emerge which weren't apparent in the variety you started with. If you grow enough self-pollinated offspring, you can start to build up a picture of the variety's pedigree, as many of the ancestral characteristics magically come back to life. So it can be a really fascinating thing to do.
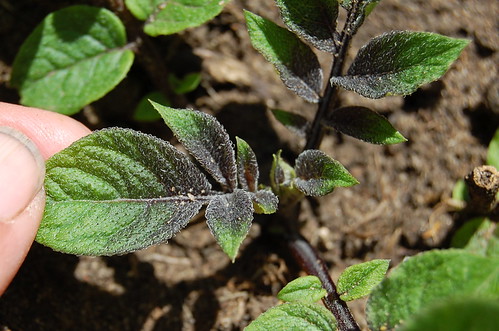
A seedling grown from self-pollinated seed of Salad Blue. It's the only plant in the batch which has this striking black tinged foliage and black stems. I'm hoping it'll produce some dark tubers to go with it.
It's important to remember though that nature designed potatoes to be outbreeders, and if they self-pollinate they may show some degree of inbreeding depression. Only a bit though. As most spuds have such a rich and diverse genepool they can get away with a certain amount of inbreeding, but you may find self-pollinated seeds grow less vigorously than hybrids. That's not a problem and shouldn't put you off trying self-pollinated seed … but it's better to sow a few more than you need and then select the seedlings which show the most vigour and whoomph.
Variety differences
Differences in the fertility of individual varieties will most likely dictate what crosses you make, and how you do them. Over many years of being propagated by tubers, cultivated potatoes have moved away from the idea of flowering and producing seeds, and many of them can't be bothered to do it any more. Ironically for such a naturally variable and heterozygous plant, a historic lack of genetic diversity is thought to be the cause of the potato's fertility issues. The vast majority of modern cultivated potatoes are descended from one single Chilean spud, which had what is known as T-type cytoplasm, a genetic predisposition to making offspring with infertile pollen. Over the years many of these semi-infertile lines have been selected deliberately, as the male-sterility makes the process of hybridising them much easier. Consequently an awful lot of modern spuds have infertile pollen, and some are female-sterile too. Some can't be arsed to flower at all, and just dump their buds as soon as they appear. There are things you can do to force a reluctant variety to produce flowers, but it's a lot of hassle which I won't go into here, and from the point of view of future breeding work it makes more sense to choose varieties that at least show some willingness to come up with the goods.
I wish I could give a simple list of which variety does what, but I only know about the ones I've grown and observed myself, and it can vary from garden to garden anyway. Different countries have different varieties - import restrictions have affected exchange of material - so the ones I work with in the UK may not be available to people in the USA (just as most popular US varieties are strangers to me). So you will have to experiment with whatever you have available. As far as I can see, varieties fall roughly into four categories.
Some potatoes are very fertile and make excellent male or female parent varieties. Salad Blue is the Cassanova of the potato world - it only has to look at another potato and a berry starts swelling. You can usually tell a fertile variety because it naturally sets its own berries in profusion. Desirée is another very fertile one, and so is Mayan Gold, although the latter is a diploid so it needs to find the right kind of partner, or get lucky mating with a tetraploid.
Most cultivars fall into the male-sterile or almost-male-sterile category - these are the ones which flower happily enough but don't tend to set berries. Highland Burgundy Red is a good example of this, as is British Queen. It gamely produces a mass of dainty little flowers but in years of growing it I've never had a single berry. Give it a dab of pollen from a fertile variety though, and it sets berries very readily. So it makes an extremely good female parent. The advantage of male-sterile varieties is that you don't have to emasculate them, which makes it much quicker and easier to hand-pollinate them. Some varieties which appear to be male-sterile may actually be female-sterile. So it's worth trying the pollen on another variety to see if it will take. The disadvantage of using these partially sterile varieties is that it perpetuates the poor fertility of potatoes. If you want to do Solanum tuberosum a real favour in your breeding projects, select the progeny for good berry production. Because good berry production is what will keep its genetic heritage alive, as well as enabling some much needed new diversity to come in.
Then you have what you might call the awkward buggers category. These include Pink Fir Apple (syn. Rose Finn Apple) which not only has male sterility issues, it often can't be bothered to set a berry even when it's given fertile pollen. What usually happens is that the flower opens happily enough and you carefully pollinate it two or three times and on the third day the whole bloody thing drops off. Or worse, it starts to set a berry and then it falls off before it's mature. It pays to try again though, because there's a good chance that one of the pollinations will take eventually, when the plant is in the right mood and the planets are in the right alignment or there's an 'r' in the month. It's a pain in the backside to have to keep pollinating more flowers, but bearing in mind that each berry can easily produce 100 seeds or more, it only takes one successful pollination to give you loads of future breeding material - so it's worth persevering. Again, with a variety like this you don't need to waste time emasculating. I just go through the whole crop each day dabbing fertile pollen on every stigma I can find and saying "come on, set a bloody berry you sod!"
And finally you have the total refuseniks. There is a wonderful Victorian potato called Witch Hill which is reputed to be one of the best flavoured potatoes around - it is truly delicious. I would love to use it in breeding work. But every year the flower buds appear, and just as they're starting to look promising they drop off. All of them. Little dessicated posies cast to the ground. Now, unless it changes its mind, I cannot breed from it. If a variety won't flower, there is no breeding possibility, it's as simple as that. I could grow fields of the stuff and hope for a spontaneous somatic mutation, but that may never happen. Witch Hill is a genetic dead end. This is why breeders like Tom Wagner select breeding lines from varieties which are good berry setters. If a variety won't flower or won't set berries, it has no future.
The annoying thing is, Witch Hill did flower for me a couple of times when I first got it (it came to me as a laboratory-grown microplant) but I hadn't got into potato breeding at that time so I didn't think to make any crosses with it. D'oh!
Hybridising potatoes: the practical bit
Let's be grateful for small mercies: potato flowers are nice and simple and easy to work with. They are 'perfect' flowers which contain both male and female parts.
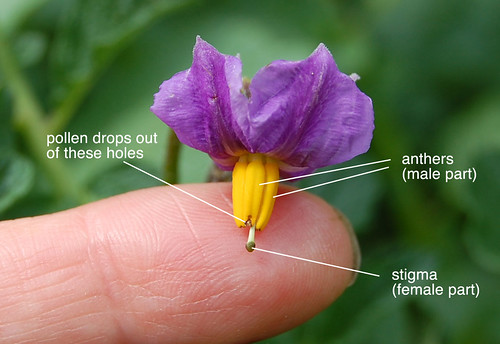
Anatomy of a potato flower. Each of the anthers is a double sac, both halves containing pollen. When the anthers mature they develop little holes in the ends (like a salt cellar) and the pollen falls out onto the stigma.
The Mayan Gold blossom shown above is fairly typical, but there are variety differences in the exact shape of the flower. Some have a long style where the stigma protrudes some way out of the flower (be aware that a sticky-outy stigma has more chance of being cross-pollinated by passing insects than one where the stigma is hidden away). Some produce a neat little fused anther cone, others produce a rather grotty collection of misshapen anthers which don't hold together properly. Some (like Pink Fir Apple) do weird things where anthers and petals morph into one another. None of this matters - the principle is the same. You'll get to know the individual character of the flowers in your own garden as you work with them.
In order to control what pollen fertilises the flower, you have to stop the flower from fertilising itself, so that means removing the male parts of the flower before they mature. As I explained above, with some varieties you don't need to do this - if the variety produces sterile pollen or none at all, you can save yourself the trouble. The instructions shown here are for if you have a fertile variety or want to be sure of getting hybrid rather than selfed seed.
Potato flowers are produced in cymes - bunches of flowers which open consecutively, 2 or 3 at a time. The flowers last two to four days but tend to close up in late afternoon. The anthers develop holes in their tips when they're ready to dehisce, though they're not very glamorous - in fact they look more like some insect has had a go at them. Potato pollen is white, powdery and very fine. The stigma is receptive for about 2 days and the period of pollen shedding also lasts about 2 days. Fortunately for the garden dabbler, the female part tends to become receptive just before the pollen starts to shed, so you have a window of opportunity to intervene.
The best time for hand-pollination is in the morning when pollen is most abundant, and when the temperature is fairly cool. But I wouldn't worry too much about this, it works at other times too.
If you're using a variety with infertile pollen, or you aren't bothered about the chance of a few self-pollinated seeds, you can skip steps 2 to 4.
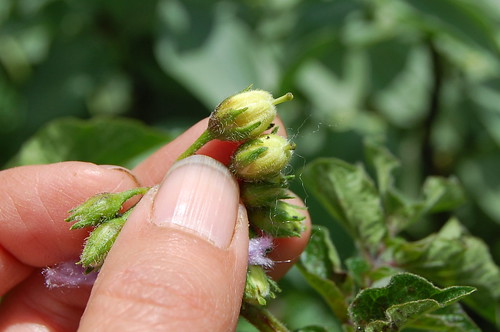
Step 1: Having chosen the variety you want to use as the female parent, find a blossom at the right stage. Potato pollen can be shed quite early, before the flower opens, so emasculation has to be done while it's still at the bud stage. What you're looking for is a nearly-ready bud where the calyx (outer green bit) has started to open but the petals are still shut. This is a variety with a sticky-outy stigma, but with many varieties it will still be hidden inside the petals. Doesn't matter either way, although a sticky-outy like this inevitably carries a small risk of picking up stray pollen from elsewhere.
You may notice a strand of mauve wool poking out underneath. I tied this around the stem of the flower (or in this instance the whole cyme, as I'm going to hand-pollinate all of them) as a marker, so I can be sure I know which ones I've hand-pollinated. I use a different colour of wool to indicate different pollen fathers.
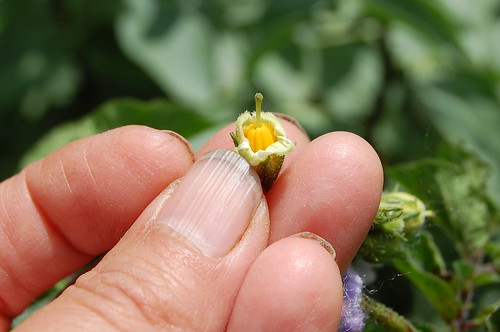
Step 2: Peel back the petals and you'll find the anthers inside. They are still immature at this stage - with no holes in the ends. If they do have holes and are shedding pollen, try a slightly younger bud instead!
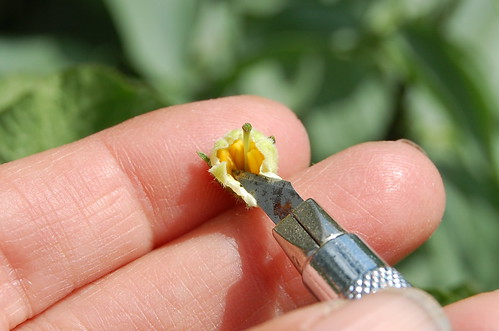
Step 3: Using a blunt scalpel blade, tweezers or similar, pull/scrape the anthers off, being very careful not to damage the style - the central stalk with the stigma at the end.
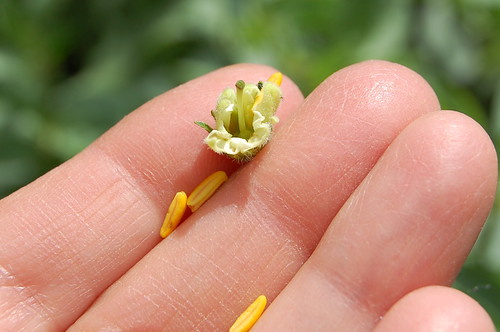
Step 4: After removing all the anthers you're left with a denuded female part, ready to be pollinated with the pollen of your choice.
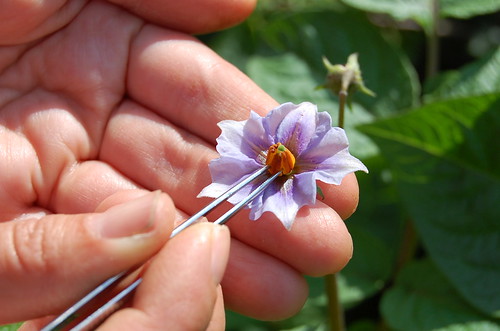
Step 5: Next find the flower you want to use as the male parent. Choose a blossom which is newly opened, as those are the ones most likely to have a good pollen stash (the ends of the anthers should be open at this stage). Pull off a single anther using tweezers/scalpel/fingers.
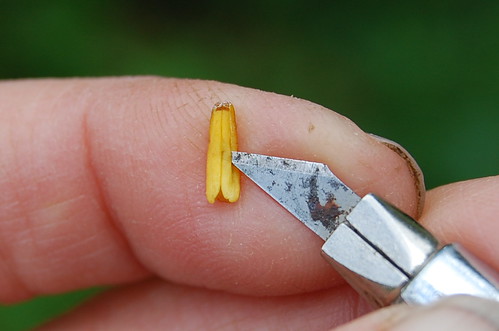
Step 6: When you turn the anther over you'll see it has a seam down the back, separating the two pollen sacs. Additionally, each individual sac has a little slit down its centre. Carefully slip the tip of a blunt scalpel blade through the slit and slide it along. Note that the slit should be open so you can insert the blade freely ... you want to avoid cutting into the anther if you can.
If there is pollen inside, you will see it on the tip of the blade. It's a very fine white powder. If you don't see any white powder, try another anther from a different flower. You don't have to collect all the pollen at once ... just scrape out enough to dab on the female flower, and use the rest for more pollinations. (When the first sac is empty you can do the same with the other side. You can often pollinate ten or a dozen flowers from the pollen in a ripe anther like this.)
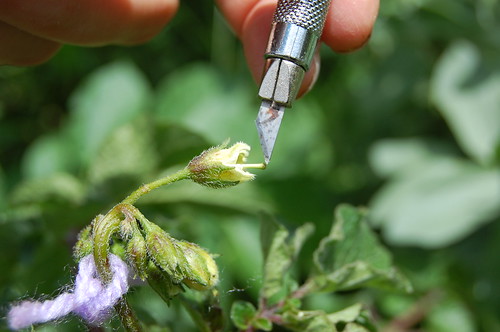
Step 7: Armed with your pollen-tipped scalpel, go back to the bud you just emasculated and dab the pollen powder onto the stigma - which is the knobbly-bobbly thing at the end. The stigma is mildly sticky when it's receptive, so you should find the pollen grains sticking to it quite readily. No need to make a song and dance with it - just a gentle dabbing so as not to risk damaging the stigma.
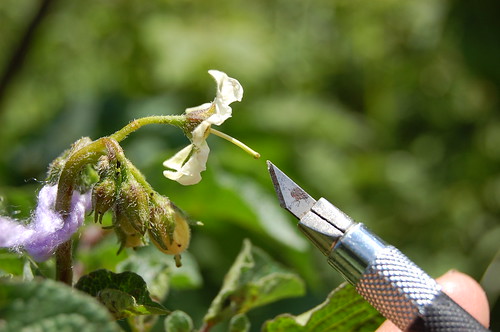
Step 8: The next day, go back to the same flower and pollinate it again with pollen from another fresh anther. The stigma remains receptive for around two days in total but you don't know exactly when that is, so for best results give it a pollen dab on three consecutive days. You'll notice that the petals have opened on this flower now, although it looks a bit weird as it has no anthers. Once the petals have closed and wilted a bit, you can assume it's no longer receptive.
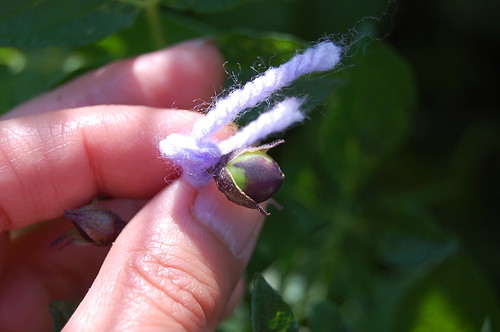
Step 9: The berry starts to form. Yay!
From this point on, patience is the order of the day. Potato berries seem to mature painfully slowly. Try to resist the temptation to prod and poke them, you don't want them to fall off as they dangle clumsily on their alarmingly scrawny stalks. After about four weeks you need to watch for them dropping off naturally. Ideally, tie a little cloth or paper bag over them at this stage so that they are caught safely if they drop. Alternatively, be very vigilant, and ready to rummage about on the ground if you notice them suddenly go AWOL. Fortunately they don't taste nice enough for animals to be interested in them, at least not in the way of UK garden wildlife, so they're unlikely to be carried off, but you don't want to chance it.
One key factor about potato berries, significantly unlike tomatoes (to which they're closely related), is that the seeds carry on developing even after they've detached from the plant, and the berries will stay firm for months. This has several advantages. For one thing it takes the pressure off you to extract the seed from them ... you can leave them until you've got the time and inclination, even weeks or months down the line. Secondly it means that all is not lost if the berry is dropped too early or the plant dies prematurely. This is very significant in the light of the blight problems we are all besieged with. The plants can be struck down by blight, wither and rot - and the berries will still survive. Save the berries and let them mature, and as long as you clean them thoroughly they will yield perfectly healthy seed.
The topic of cleaning and processing TPS from the berries is to be the subject of a separate post. In the mean time, go out and make some berries!
With thanks to Tom Wagner and friends at the TaterMater forum for advice and suggestions (any errors are entirely my own responsibility).
Tuesday, 30 September 2008
The joy of genes ... illustrated!
Patient readers who have put up with me banging on about gene segregation and F2 hybrids ... here's a little photo sequence from one of my breeding projects to show the process in action. I hope this will be a lot more interesting and meaningful than my simply talking about it, since it shows what amazing and beautiful diversity is locked up within every seed. If it inspires you to have a go at some hybridisation yourself ... so much the better.
OK, so these are pictures of pea seeds from my Yellow Sugarsnap project. It matters not what the objective of the project is or how close I am to achieving it ... this is just an illustration of what happens when you cross two varieties.
In this case I started off with Golden Sweet, an old heirloom supplied by the Real Seed Catalogue, and Sugar Ann, a bog-standard commercial variety from a garden centre.
 The original parent varieties. Golden Sweet (left) has dimpled tan or grey seeds with purple speckles, while Sugar Ann has pale grey-green or cream seeds which are more wrinkled and slightly bullet-shaped.
So I made a cross between these two varieties, thus creating an F1 hybrid, and this is what the seeds looked like:
 F1 hybrid between Golden Sweet and Sugar Ann
Sorry this is a bit of a small sample, but I'd already planted most of my F1 seeds by the time I took the photo. Anyway, you may notice that the F1 hybrid seed looks exactly the same as the original Golden Sweet seed. There's a good reason for that. The embryo hidden deep within the seed has the hybrid DNA made by the cross-pollination, but the rest of the seed (including its outward shape and colour) is the product of the mother plant. Therefore it looks just like any other seed produced by the mother plant. If I'd done the cross the other way and used Sugar Ann as the mother plant, then all the F1 seeds would have looked like Sugar Ann.
The next step was to grow the F1 seeds and collect seed from them, giving me the F2 generation. I didn't make any further crosses ... as peas are self-pollinating, all I had to do to obtain the F2 seed was to grow the F1 plants and allow them to produce seed naturally. This is the result:
 F2 hybrid between Golden Sweet and Sugar Ann (i.e. the seeds from the F1 plants)
Hey up, now we've got something happening. The F2 seeds no longer look exactly like the Golden Sweet parent. In fact if you look closely they're all different. The differences are quite subtle but they vary in colour, size and shape. Some are wrinkly while others are smooth or dimpled. Some have purple speckles, others are plain. They show a jumbled up mixture of traits from the original parent varieties, caused by the random segregation of genes from both parents.
This is the point where plant breeding becomes immensely fun. Because every one of these F2 seeds produces a plant that is unique. And once again I don't need to do any crosses, I just grow the F2 plants and let them set seed naturally to produce the F3 seeds. And I get THIS:
 F3 hybrid between Golden Sweet and Sugar Ann (i.e. the seeds from the F2 plants)
This is actually just a random sample, the first nine plants to reach maturity. There were many many more variations, but these few are enough to show you what's happening. I've saved seed from each F2 plant individually, and you can see that there is some consistency in the seed type for each plant, but HUGE variability between plants. Plant 58 produced seeds the same shape as Sugar Ann but a much brighter green and with purple speckles. Plant 02 produced seeds the same shape as Golden Sweet but green instead of tan. Plant 25 produced exceptionally wrinkled seed with no speckles. Plant 09 produced large round smooth yellow seeds which are totally unlike either of the original parents. Plant 14 shows some variability within itself but again a spectacular diversion from the original parent varieties, because the whole seed coat is sploshed with solid purple with a few bright greens and pinks thrown in.
 Same image, detail
Every one of these packets of F3 seed is a brand new, unique variety in its own right. I could give them all names and launch them on the world. There wouldn't be much point doing so, partly because their offspring would still show some variability and further segregation (so they need to be stabilised for a few more generations first) but also because they won't all be worth pursuing. At a glance I'd say that Plant 09 with its big smooth yellow seeds is probably not going to taste good. In fact I did eat some of its seeds while they were still fresh and they were hard, mealy and bitter. By contrast, the exceptionally wrinkled seeds of Plant 25 indicate an exceptional sweetness, confirmed by taste tests, and that one is probably worth pursuing. Plant 37 also looks useful, as it has the supersweet ultra-wrinkled seed combined with pretty purple, pink and green colouring. There's enough interesting material here to keep me occupied for years. All from a single cross!
Anyway, what I hope this illustrates is that all these seeds are different from the original parent varieties in ways I couldn't have imagined when I made the cross. There are some familiar traits showing up, but also a lot of brand new ones which weren't displayed by either parent. And some of those brand new traits are really quite exciting.
What these pictures show is segregation for seed-coat colour and seed shape. Because in peas those two traits are readily observable. Of course the same level of segregation is happening to ALL traits right across the genome, with potentially millions of different combinations. I hope this gives some idea of how much diversity and scope for new varieties is possible just from making one simple cross-pollination.
Sunday, 20 May 2007
How to breed your own garden peas
Normally when a seed company is trying to develop a new variety they keep very quiet about how they're going about it, knowing that if they come up with something worthwhile everyone else will want to copy it.
There's no secrecy involved in the pea breeding project I'm doing for Ben and Kate at the Real Seed Catalogue. One thing I have in common with them is that we all believe passionately that genes, seeds and the skills involved in their production should be in the public domain. Unlike most seed companies they have extensive seed saving instructions on their website and I've been open about which varieties I'm crossing in trying to develop a new variety for them. So what's to stop anyone else copying what I've been doing? Absolutely nothing. And just to make sure you know how to, I'm going to explain hand-pollination.
The principles of making crosses by hand-pollination are fairly universal, and yet the details differ hugely from plant to plant. These instructions are suitable for all kinds of culinary pea, and will also work for sweet peas, and once you know what you're doing you can apply it to other plants. The basic principle is this: if you have a self-fertilising flower like a pea, and you want to cross it with something other than itself, you first have to remove its capability to self-fertilise.
So the first step is to emasculate the 'mother' flower by removing the little yellow blobs which produce pollen. That will leave you with just the female part, which is a long bendy green thing with a bristly bit down one side. With me so far?
 Know your blobs from your bendy bits. The anatomy of a pea flower (with keel cut open)
Pea flowers have all their reproductive bits inside the keel, which is a sealed petal bag. The long green central bit is the style, but only the very tip is receptive to pollen. The pollen-bearing anther blobs gradually grow up towards the tip and shed pollen all over it. By removing the anthers before they get to that stage, you can intervene and fertilise the flower with the pollen of your choice.
The first step is to find a flower at the right stage. With peas that means using young buds, because their self-pollination happens very early on before the flower is anywhere near opening. The optimum stage is impossible to define precisely because it varies quite a lot in different weather conditions, and to a lesser extent between different varieties. The easiest time to do hand-pollinations is on a dry, cool, overcast day. On days like this the pollen is slow to shed (or dehisce, if you want the technical name) so you can get away with using larger buds which are easier to work with. When the weather is hot and sunny the pollen just goes nuts and splurges everywhere, so you have to resort to using only the youngest, tiniest buds. Windy weather is also a hindrance (try carrying a blob of pollen across a breezy garden on the tip of a scalpel blade and you'll see what I mean).
But as a general rule, choose buds where the petals are just about visible as they start to protrude from the sepals. The photo below shows a promising-looking bud.

Step 1: Peel open the bud ... gently roll back the sepals and the two outer layers of petals, and grasp them back out of the way. Inside you will find the keel petal, which is a sealed bag with a crinkly seam down the middle a bit like a cornish pasty. Using a scalpel or similar, carefully cut a slice in the keel. (You can remove part of it if necessary ... it won't do any harm.)
Step 2: As soon as you cut the keel open you will be able to see whether the bud has already self-pollinated or not. In an ideal bud, the anthers will be smooth dark yellow blobs with no traces of yellow powder on them, and will not yet have grown right up to the tip. Being careful not to damage the long green bendy bit in the middle, hoik out all the yellow blobs and pop them off with the scalpel blade. There are ten of them and it's best to remove them all.
If the anthers look fluffy or there is yellow powder inside the keel, it's probably too late. If in doubt, have a look at the tip of the green bendy bit. If it looks pristine it should be OK, but any trace of yellow stuff on it means that self-pollination has already happened.

Step 3: Mark the bud by tying a scrap of coloured thread around its stalk ... not too tight, to allow it room to grow a bit.
Step 4: Find a pollen source on another plant, of whichever variety you want to use as the 'father'. Again you may need to do a bit of poking about with a scalpel to find one with lots of pollen to spare, as it varies with the weather. The best ones are usually larger buds which are almost ready to open. Slice open the tip of the keel and scoop out as much as you can onto the blade. This will not harm the flower at all, because it will already have self-pollinated and started growing a pod ... all you're doing is making use of the surplus pollen. Fresh, fertile pea pollen is a deep rich yellow colour. If it's turned a pale sandy colour it's too old.
Step 5: Take the pollen to the 'mother' flower and gently slather it all over the tip of the green bendy bit. The receptive part is the stigma, which is the flattish area right at the tip. Please note, the stigma is NOT the bristly brushy bit just below the tip ... it may look like it should be, but it isn't.
It can be a bit fiddly to get the pollen in the right place but it gets easier with practice.

Step 6: If the remains of the keel petal are still intact, slip it back over the green bendy bit to give it some protection and help stop the stigma drying out. It's not essential though ... you can get away with just closing the outer petals back over it.
The flower should then open pretty much as normal over the next few days, and shortly afterwards you will get a pod. While the pods are small they are translucent against the light, so you should be able to see the baby peas inside if the pollination was successful. If it wasn't successful the flower will drop off.
In peas, it's quite usual for hand-pollination to have a lower success rate than natural self-pollination. So don't worry if your hand-pollinated pods only have two, three or four peas inside them. That's normal.
If you're looking to possibly produce a new variety, it's a good idea to hand-pollinate quite a few flowers ... at least 20. You don't need to do them all at the same time ... just do three or four a day for as long as the plants are producing good flowers. Allow the pods to develop fully and harvest them when they've started to go dry and crispy (in wet weather you may have to grab them earlier, to avoid problems with mould). Hang them up in a dry airy place to finish drying. You now have your own unique F1 hybrid peas. When you grow them they should produce plants with a mixture of characteristics from both parents.
Thursday, 3 May 2007
Well here we are in May already ...
 California poppies, from seed I sowed last year. They overwintered without any protection and were in flower by late April. Pretty good going I reckon!
Oh dear, I have been most remiss in keeping my blog up to date over the last month. I've been totally wrapped up in getting everything sorted out for my album, which is a month behind schedule and still not ready for release, but it's getting there.
So I thought I'd just catch up a little by posting some pictures taken in the garden today, since everything has been growing away nicely in spite of me.
 One of the things I love about California poppies is the groovy little witches hats they produce when they're in bud. As the flower unfurls, the hat slides off. Then another one appears as the seedpod develops.
Meanwhile, I should be able to make a start on some pea breeding work in the next few days. I'm trying to produce a new purple mangetout (snow) pea for The Real Seed Catalogue based on a cross between their yellow-podded mangetout Golden Sweet and a purple-podded sheller, Desiree. They sent me some seeds to start me off and I've been growing them side by side in a bamboo frame and hoping to goodness they'll both flower at the same time so that I can do some hand-pollinations. Fortunately, as the pictures below show, they are looking to be doing just that.
I've grown Golden Sweet before, but I didn't know much about Desiree before I started growing this crop. I'm a bit surprised to find it's a dwarf variety (or at any rate, doesn't seem inclined to get beyond about one and a half feet). The reason I'm surprised is that all the other purple-podded peas I've collected have been tall varieties which reached at least five feet ... so I'd kind of taken it for granted that this one would be too.
You can tell when Golden Sweet is getting ready to flower because it starts to show a lot more yellow colour in the young leaves and stems. And the buds are quite easy to spot as soon as they start to form because they have pale cream-coloured sepals (those are the little spiky bits that make up the 'pixie-hat' around the flower) which stands out visibly from the greeny yellow of the leaves. Another peculiarity of this variety is that the flowers never really open out properly, but to make up for it they do go through some beautifully dramatic colour changes.
 This Golden Sweet flower bud is at about the right stage for hand-pollination. Yes I know it's tiny, but peas are extremely efficient at self-fertility, so if you don't catch them early in the bud stage it'll be too late to do a cross with another variety. This bud is so small it hasn't started to open or colour up yet, and the petals are still tucked away under the sepals ... but the female stigma will be receptive by now, so this is the right time to make a cross by introducing pollen from another flower.
 To find flower buds on Desiree I have to delve into the foliage because they're a bit less developed, but they are there. Here you can see a whole cluster of tiny flower buds, which have a distinctive purple flush on the sepals. These are too young for hand-pollinating, but soon, soooooon ...
As it's going to be a few days yet before Desiree is ready for pollinating, I may start off by making a different cross. I will have no shortage of flowers on these plants, so I can make as many crosses as I like as long as I label them properly. The only other pea that has flowers open at the moment is the dwarf sugarsnap, Sugar Ann. So I may as well try crossing Golden Sweet with Sugar Ann ... the obvious outcome would be the possibility of a yellow-podded sugarsnap, which would be nice, but actually these varieties are so different almost anything could happen. So it must be worth a go.
 The flowers of Sugar Ann look a little different from the other peas I grow ... they have very wide open wing petals, so the innermost keel petal (which is normally fairly well hidden) is exposed. I don't suppose it makes much difference to anything, it's just an observation.
Tuesday, 22 August 2006
How to hybridise tomatoes
 Emasculated tomato flower (in this case Tangella) with the anther cone removed, leaving just the outer ring of petals and the central pistil.
What more exciting project could a gardener wish for than to breed your own unique tomatoes? Many of the heirloom varieties and some of the long-standing catalogue favourites were originally bred by curious amateurs. And why not? All you need is a bit of patience and the easily learned skill of hand-pollination.
As with most things in the garden, there's a "proper" way to do it and an "oh sod it that'll do" way. I admit I tend towards the latter. So the method described here is slightly less complicated than some of the other pollination guides I've found on the net. But it really doesn't need to be complicated if you're doing it on a garden scale rather than a commercial one.
Compared with peas, hand-pollinating tomatoes is quite simple. The flower structure is very basic. But there are a couple of practical issues which make it less easy: the flowers are smaller, so you need good eyesight and/or a magnifying glass to see what you're doing, and the pistil is fragile and easily damaged. Unlike peas, where the pistil is quite bendy and robust, tomato pistils easily snap off or get kinked. So don't feel bad if you ruin a few flowers before you get the hang of it. The plants won't mind ... they'll just produce new ones.
Hybridising tomatoes is a two stage process: emasculation (removing the male bits) and pollination (introducing male bits from a different variety).
Tomato flowers have a layer of petals which open out fully when the flower matures, and a yellow cone in the centre which is formed from the anthers (pollen sacs) which are fused together. Inside the cone is the pistil: the long green stalk which carries the all important stigma at its tip. The norm for tomatoes is perfect self-pollination. Pollen is shed on the inside of the cone and falls straight onto the stigma. There are no bees needed, and the stigma may never be exposed to the outside world. To hand-pollinate a tomato flower, you need to stop this from happening by removing the anthers before they shed pollen.
 These two buds both make good pollination candidates, subject to the variety and weather. The open flower on the right is at a good stage for pollen collection.
In an ideal world you would do your pollinations on the first few trusses that form on the plant, and use the first buds on each cyme. But any good-sized healthy bud will do the job. The important thing is to identify them at the right stage. Tomatoes normally self-pollinate at around the time when the petals open, so choose buds which are just starting to colour up, with the sepals (but not the petals) just opening. The exact time will depend on the weather, because they are reluctant to shed pollen if it's cool or wet but begin shedding it rapidly when the sun comes out. It's best to do the emasculation when the weather is cool and overcast.
My tool for tomato pollination is my artist's scalpel (and a cheapie one at that). People who do this commercially use pointy-tipped forceps, but most gardeners don't have things like that lying around in their sheds. Any small blade will do, as long as you clean it each time you poke it into a flower. I just wipe it on whatever I've got handy (my clothing has been known) and nip into the house to wash my hands before moving on to a plant of a different variety. As long as you're conscious of the risk of contaminating your hybrids with stray pollen and take reasonable care not to, you shouldn't have a problem.
 Use the scalpel to prise the segments of anther cone open
Having selected your bud, open out the petals to reveal the cone inside. The petals usually open quite readily and stay out of the way. Using the tip of the scalpel blade, prise the tip of the anther cone open just far enough that you can grab a segment of it with your fingernails, then peel it down to the bottom and pull it off. Remove all the segments so that you're left with just the long green pistil in the centre (see below).
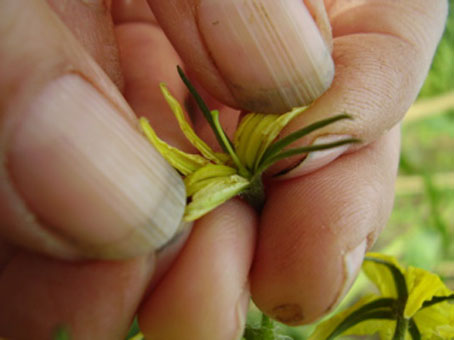 Open the anther cone completely and pull off all the segments so that you're left with the green pistil (notice the bobbly stigma at its tip). Eww, look at the state of my fingertips. That's what playing the mandolin does for you. Like strumming a cheesegrater.
You can use the scalpel to remove the segments of anther if you prefer, but try not to poke it into the anther itself or it may spill some pollen. The aim is to remove the anthers without breaking them so that no pollen is shed. You should also have a look at them to make sure they aren't already shedding any; if you can see traces of yellowish-white dust then it's too late to do the cross and you'll have to try again with a slightly younger bud (or on a day when the weather is cooler and damper).
The other thing you will have to watch for is not to damage the pistil. In some varieties, especially older ones, the stigma is flush with or actually sticking out from the anther cone. In other cases the pistil is very small and thin and tightly snuggled within the anthers. Either way you will have to take care not to rip it off along with the anther segments. You will get better at this with practice but will probably end up ruining the occasional flower no matter how many times you do it!
OK, so that's the mother bud sorted out. The stigma is normally receptive a day or so before any pollen is shed, so in most cases you can get on and do the second stage of the process (pollination) straight away. The stigma tends to go somewhat bobbly and blobby when it's receptive, but it's more apparent in some varieties than others. It should certainly be free of any obvious traces of pollen. Once you've done a few pollinations you'll learn to see when the stigma is clean and receptive. Some tomato breeders leave the pollination until the next day to give the stigma more time to mature, others just get on with it. Better still, if you have the patience, is to do both. I've found that carrying out the pollination two or three times on different days increases the chances of it taking successfully.
Now you need to collect some pollen from the plant you're using as the other parent. For this you'll need to find a flower that's recently opened and pull off a segment of the anther cone. The anthers take the form of plump yellow sacs, which split along the seams when they're ripe so that the pollen is sprinkled out through fine slits. It's not always very abundant though, and it's also very fine and easily blows away! Most ripe flowers will usually have some pollen to spare though. The easiest way to collect it is to scrape the blade along the length of the anther a couple of times in one direction. It's quite a pale coloured pollen, and exceptionally long lived. Sometimes there's a small 'pool' of pollen towards the tip of the cone if it's already been shed. If it hasn't been shed yet you may have to extract some from the sac itself by slitting it open and scraping out the contents onto the scalpel blade.
Then take the pollen-laden scalpel to the mother plant (watch the pollen doesn't blow away en route) and dab it very lightly and gently on the stigma. If the stigma is a reasonable size and/or you use a magnifying lens you should be able to see the grains of pollen clinging to it.
And that's about it really. The flower may look a bit silly, being just a stigma in the middle of a ring of petals, but it generally doesn't need to be taped shut or protected with anything. The risk of contamination with stray pollen is low, since there's nothing to attract any insects to it, and there shouldn't be any problem with the stigma drying out as long as the weather is not too hot and dry. So you can just leave it to get on with it, and it's readily accessible if you want to give it a second dose of pollen the following day.
Sometimes when you try to pull the anthers off a mature flower to collect the pollen the entire flower face comes off – petals, anthers, the works – leaving behind only the pistil. You can often use the whole thing just as it is by placing it over the pistil of the emasculated mother bud. A kind of flower transplant. It only really works if the two plants have flowers of a similar size, and you may also need to tie a piece of cotton thread or wrap a tube of masking tape around it to hold it in place. My experience is that it's quite an effective way to get good pollination, but I'm much more likely to snap the pistil off in the process ... and that means starting all over again.
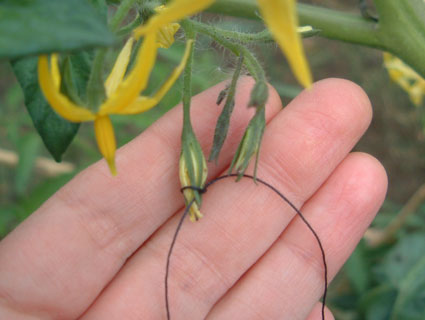 Pollinated bud clamped shut by tying a cotton thread around it in a single knot, not too tight. You don't need to do this unless you're trying to hold a "flower transplant" in place, or it's very hot and dry and you're worried about the stigma getting dessicated.
After pollination you have to wait for several days before you can see whether it's worked (unless the bud falls off, which is a pretty unambiguous negative). With a bit of luck you'll start to see some swelling at the base of the pistil and before you know it there's a tiddly green tomato emerging. You will almost certainly find that not all your efforts are successful. This is normal. Hand-pollination is rarely 100% effective, and it's best to do several buds to allow for some failures.
One thing I haven't mentioned is how to choose which tomatoes to hybridise. To some extent that's part of the fun. You can design your own ideal tomato by deciding which characteristics you'd like and breeding together two varieties which most closely bring together the traits you want. Or you can just hybridise whatever you happen to have flowering in the garden and see what you end up with.
If you want to breed a new variety which you can select from and continue to grow in the future, you'll need to start with open-pollinated varieties (i.e. ones that come true from seed). Most tomatoes are ... just avoid any that are already F1 hybrids. The seed you produce from your cross will be a new F1 hybrid, and all the plants from it will be very uniform. When you allow that generation of plants to self-pollinate you will get F2 hybrid seed, whose plants will show a range of different characteristics as the mixed up genes of the two original parents start to separate out. At that stage you can select the characteristics you want for your new variety.
How long it takes to create a new true-breeding variety depends on the genes involved, whether they're dominant or recessive and various other factors, but tomatoes are easier than most because they can be inbred without any ill effects. So breeding a new variety could be as simple as finding something you like in the F2 generation and allowing it to self-pollinate. In other cases you may get some variation in the offspring and have to 'rogue out' any off-types for a few more generations to stabilise your new variety.
If you choose one or more F1 hybrid varieties as parents for your hand-pollination you will end up with all sorts of unpredictable weirdness. That doesn't mean you shouldn't do it, but you should be aware that it's the genetic equivalent of chucking everything into a big melting pot. F1 hybrids are not true-breeding and the seeds you get from your pollination will have all sorts of segregations of different genes combining with more different genes from the other parent. You could end up with pretty much anything!
(With thanks to my friend Caroline for helping me with the photographs.)
Friday, 11 August 2006
How to hand-pollinate sweet peas
Why would you want to? Well, I'm thinking that it might be fun for those who want to try breeding their own unique varieties. Also, as it's fairly easy to do, it would make a good starter project for anyone who wants to try out hand-pollination for the first time.
I'm not providing any information on sweet pea genes here ... and that's because I don't know anything. So if you want to try it it'll just be a case of breeding two different things together and seeing what happens. But that's all part of the fun. Try cross-pollinating plants with very different flower colours and see what you end up with.
Hand-pollinating sweet peas is exactly the same method as for culinary peas (which I covered in detail in another post), except that it's a lot easier because the buds are bigger and easier to open and the stigma is so huge you can't miss it. The only bit that's slightly tricky is making sure you choose buds at the right stage. Sweet peas are inbreeders and are very efficient at self-pollinating while the buds are still quite young. To make a cross, you have to catch them just before they self-pollinate and remove the anthers (emasculation). Luckily the anthers in sweet peas are large and easy to pull off.
 The lower bud is at the right stage for hand-pollination. The petals are just starting to emerge from the sepals (that's the outer bit that looks like a little green pixie hat) but haven't really started to develop their colour yet.
 This is the same bud with the outer petals folded back and the inner keel petal removed. You will find a long green pokey thing (style) with a receptive tip (stigma), plus ten yellow anthers. Check that the anthers have not yet begun to shed pollen (if they have it's too late) and carefully remove them all with a scalpel blade.
 Now collect some fresh pollen from the donor plant ... a bud that has just opened is usually ideal. Collect it on the blade of the scalpel and then carefully dab it onto the stigma of the first bud. The stigma is right at the very tip of the green pointy thing. You should see the grains of pollen sticking to it when you've done it right. Then just fold the petals back into place and let nature do the rest.
Don't forget to mark the pollinated bud though (I usually tie coloured threads round them) or you'll never find it again!
(With thanks to my husband Ian for the loan of his fingers in this photoshoot)
I'm not providing any information on sweet pea genes here ... and that's because I don't know anything. So if you want to try it it'll just be a case of breeding two different things together and seeing what happens. But that's all part of the fun. Try cross-pollinating plants with very different flower colours and see what you end up with.
Hand-pollinating sweet peas is exactly the same method as for culinary peas (which I covered in detail in another post), except that it's a lot easier because the buds are bigger and easier to open and the stigma is so huge you can't miss it. The only bit that's slightly tricky is making sure you choose buds at the right stage. Sweet peas are inbreeders and are very efficient at self-pollinating while the buds are still quite young. To make a cross, you have to catch them just before they self-pollinate and remove the anthers (emasculation). Luckily the anthers in sweet peas are large and easy to pull off.
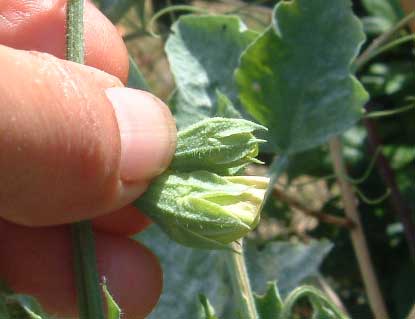 The lower bud is at the right stage for hand-pollination. The petals are just starting to emerge from the sepals (that's the outer bit that looks like a little green pixie hat) but haven't really started to develop their colour yet.
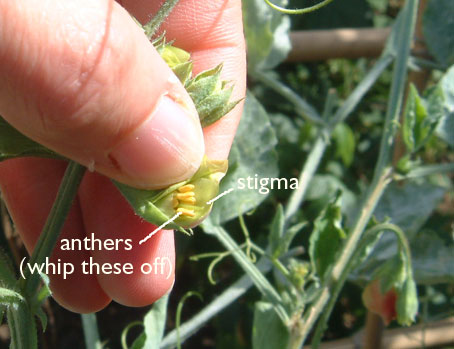 This is the same bud with the outer petals folded back and the inner keel petal removed. You will find a long green pokey thing (style) with a receptive tip (stigma), plus ten yellow anthers. Check that the anthers have not yet begun to shed pollen (if they have it's too late) and carefully remove them all with a scalpel blade.
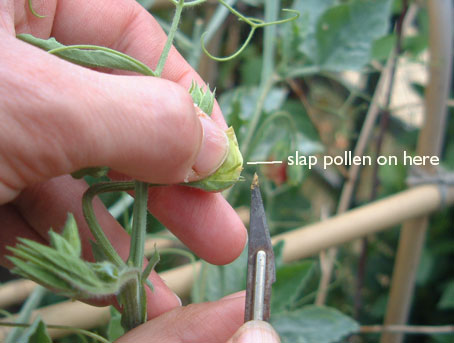 Now collect some fresh pollen from the donor plant ... a bud that has just opened is usually ideal. Collect it on the blade of the scalpel and then carefully dab it onto the stigma of the first bud. The stigma is right at the very tip of the green pointy thing. You should see the grains of pollen sticking to it when you've done it right. Then just fold the petals back into place and let nature do the rest.
Don't forget to mark the pollinated bud though (I usually tie coloured threads round them) or you'll never find it again!
(With thanks to my husband Ian for the loan of his fingers in this photoshoot)
Friday, 28 July 2006
More pea-related ramblings
 Sweet peas growing through the sagging remains of my Alderman crop. I'm a great believer in mixing up pretty flowers among the veg. For most things it encourages better pollination, although peas don't need bees so in this case it's purely decorative.
I've had grovelling apologies from both my next door neighbours today. Mrs Leafblower apologised after she accidentally hosed me down while watering a capacious shrub growing against the lattice fence which separates our gardens, having not noticed me crouched down sowing seeds on the other side of it. Then the other neighbour's mum came round to apologise for an incident early this morning when her son's dog spotted a cat in our front garden (not one of ours) slipped his leash and came charging through the hedge in pursuit. Fortunately for the cat, this dog is endowed with a peculiarly short attention span and only got half way across the garden before stopping to crap on the lawn.
Despite all this excitement I managed to get the Alderman peas planted out in the former potato bed. The soil has fluffed up a treat after having a sack of horse manure dug into it. I've put in a row of canes for them (for stability) and a few prunings from the Ceanothus tree for them to hang on to. This seems to be extremely important for peas, getting the 'pea sticks' in straight away; they know when they've got something twiggy to get their tendrils round and respond accordingly. If you don't provide them with twigs, they sit there and sulk.
I've had a lot of failed pea crops in the past, and have had to experiment a bit to find a method of growing them which works for me. It may not work for anyone else, of course. But this is what I do. I put eight or ten bog-roll tubes on a large saucer (if I need to label the varieties I write on the tubes with a marker pen) and stuff them firmly but lightly with compost made from coir, sand and perlite. I don't bother being precise about proportions of different ingredients ... I try to trust my gut instinct with it. But I recently upped the perlite quota substantially after most of my precious Champion of England seeds rotted off ... it helps keep the mixture open and aerated. I keep space between the tubes too to allow air to circulate around them (otherwise they're prone to going mouldy). I sow two seeds in each tube.
 Champion of England. It's tall.
The trouble with pea seeds is that they rot very easily, but still need plenty of moisture to germinate. Getting the balance right so that they survive the germination stage can be quite tricky. What I tend to do is keep the bottom of the saucer regularly topped up with water, without letting it build up to the point where the tubes are left standing in water. If they need the water, they soon suck it up. I usually water them several times a day in this manner. Watering from the base is the key though; it keeps the area around the seed relatively dry while encouraging the roots to push downwards to find the moisture. Usually the roots are poking out the bottoms of the tubes within a few days (and at that stage it's even more important to keep them well watered so that the roots don't dry out and die off). I still get the odd seed going mouldy but on the whole this method works pretty well for me.
And incidentally, I'm not just being a cheapskate here: I rate ordinary bog-roll tubes more highly than the purpose-made root-trainers you can buy in garden centres. They're sturdy, porous and biodegradable. All lavatorial cardboard in our house is assiduously collected throughout the year for this purpose.
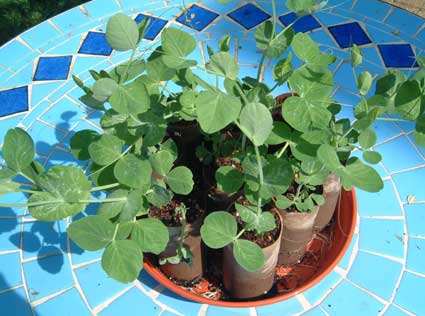 My Alderman seedlings, well rooted and ready to make a bid for freedom
I'm currently trying to persuade my home-saved seed to germinate, but most of it is rotting off before it even thinks about sprouting. I'm not sure whether this is anything to do with sowing it fresh (I had no problems at all with the Alderman seeds which were dry from a packet) or whether it's some other factor. My thinking is that it's probably the balance of moisture and temperature which is to blame. But getting that balance right is still a matter of trial and error. According to Carol Deppe, and I've no reason to doubt her, you can sow fresh peas as soon as they mature without having to dry them down first. Just soak them in water until they germinate, she says. Well, I've tried that. And no matter how regularly I refresh the water I'm just ending up with a stinky fermenting mess.
It could of course be down to the weather. Peas are a cool-climate crop and sowing them in these mad summer temperatures is not ideal. I will try my next batch in the coolest place I can find. But these hand-crossed hybrid seeds are not easily replaceable so I can't afford to keep losing them.
And for my next trick I'm trying out a plastic pot sterilised in hot water, a posh expensive coir medium mixed with a little vermiculite, and sowing the peas with just a sprinkle of vermiculite on top. In theory this should keep the seeds moist but still allow plenty of aeration. I bloody hope so anyway.
The hand-pollinations were ostensibly successful. I have several nice plump pods full of home-made F1 hybrid seeds waiting for the right moment for harvest, and have gathered in a few already. They don't generally have as many peas in them as a naturally self-pollinated pod, but that's normal.
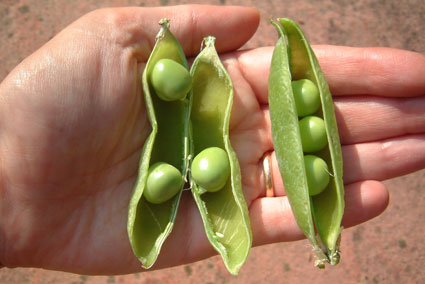 Lovely plump HUGE seeds from an Alderman x Mr Bethell's Purple Podded cross ... even if there are only three in a pod.
OK, here comes a load of nerdy botanical stuff. I've noticed that the hand-pollinated pods with the most peas in them are the ones where I left the outer sepals intact on the flower bud. When I learned to do pea pollinations I had instructions to take the sepals off first to make the tiny buds easier to handle. But I find it results in the outer petals quickly drying out and falling off, and I'm now wondering if this causes the stigma to dry out excessively. I've tried a few different variations and I'm finding that the less damage I do to the flower bud (even the parts which don't seem to matter) the more fruitful the pollination is, with the healthiest pods and largest pea numbers resulting from those where I did nothing more than cut a small slice in the keel to hoik the anthers out. I've recently discovered that removing the sepals is actually unnecessary as they're quite easy to fold back out of the way (tearing them slightly seems to do no harm). Leaving them mostly intact makes the pollination job marginally more fiddly but seems to increase the average yield from 0-3 peas per pod to something more like 6-7 per pod. Ha! Plant-breeding is a constant learning experience.
I've also, incidentally, noticed a higher success rate in the buds which I pollinated twice (emasculated and pollinated on one day and then pollinated again 24 hours later). So even though the stigma is supposedly receptive in the early bud stage, it does seem to be more receptive if you give it an extra day.
Knowing when to harvest is the biggest unknown for me at the moment, and the info I've found about saving seed from pea plants tells you to leave the pods on the plants until they're completely dried out, several weeks past the eating stage. That's all very well under optimal conditions, but it doesn't take into account the summer ravages of the dreaded pea moth. If I leave the pods on the plants until they start to go brown I'm finding them full of horrible little maggots ... a risk I can't afford to take with my precious hybrid experiments. I'm finding that the stage where the pods just start to go leathery is a good compromise.
Meanwhile, although I'll have to wait till next season to conduct a proper trial of purple-podded peas, a packet of Ezethas Krombek Blauwschok arrived this morning from Chase Organics and I've slung a few into bog-roll tubes to see if I can grab a late crop for this year. It's already clear that this variety is not the same as the ones I've already seen; the seeds are large-ish with a distinctly brown colour and many are somewhat flattened in shape. Although it's hard to be sure the colour differences are genetic rather than just down to variations in harvesting and storage, the ones I saw at the Rococo Garden had a similar flatness but were distinctly smaller and greener, while Mr Bethell's Purple Podded has larger, rounder seeds with a yellowy-green colour.
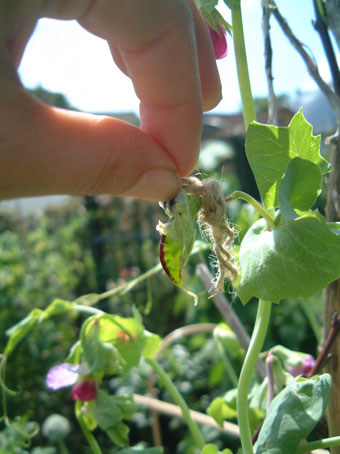 Taken a couple of weeks ago, this photo of a baby pod on Mr Bethell's Purple Podded shows how the colour starts developing just along one edge before the whole pod turns purple. This one has been hand-pollinated with Champion of England and you can see all the tiny peas inside ... the future of my breeding experiments.
Thursday, 20 July 2006
Today in the garden ... heritage vegetable taste tests!
 One of my hand-pollinated buds on Mr Bethell's Purple Podded, wearing some gold braid as a marker. This one was crossed with Alderman a few days earlier. I've found that if you leave the sepals intact when you do the pollination jiggery-pokery the flower will open as normal (as this one has). Tearing off the sepals makes the petals dry up and the flower dies off without opening. It's just a cosmetic matter, but I like to make the most of me flow'rs ...
Apart from the broad beans, which were from W Robinson & Son, all these vegetables came from the Heritage Seed Library.
I've been watching the progress of Mr Bethell's Purple Podded with great interest, as you'll have noticed, and overall I'm quite impressed with it.
It doesn't seem to like the really hot weather ... the lower leaves have died off considerably during the last couple of days. It's also stopped flowering now, but that's probably because I've allowed some of the pods to reach full maturity (this crop is mainly for seed production ... the Heritage Seed Library issues its pea seeds in packs of 10, which is not really enough for a proper food crop but does allow you to build your own stash of home-saved seed, which is kinda the point really).
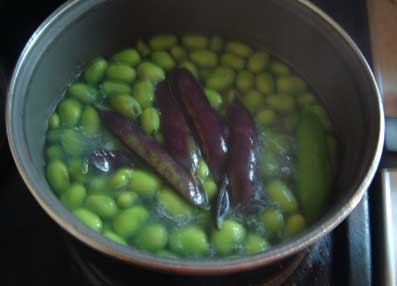 Stewing up some purple pods with the last of the red-flowered broad beans
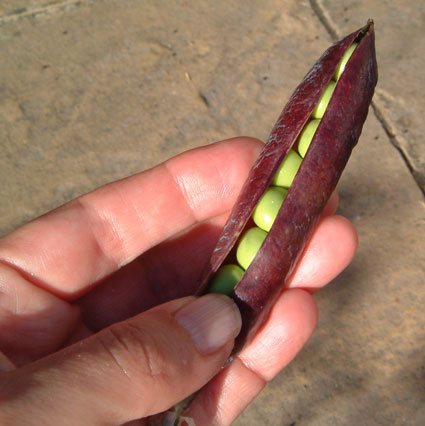
There's enough there to provide a tantalising taster anyway. I'm finding that the pods are lovely as mangetout if you use them when they're small; once the peas start to swell inside they go a bit stringy. They are a beautiful maroon-purple (translucent in sunlight) but lose some of their colour when they're cooked ... still retaining enough to make them a show-stealer at dinner. The flavour is not outstanding when they're larger but if you use them young they're very sweet indeed.
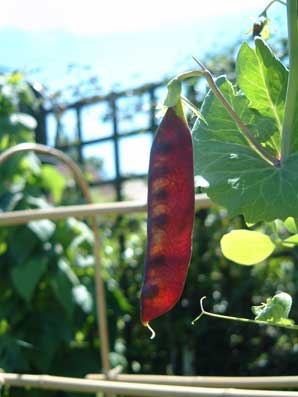
And here's what you get when the peas are fully grown ... as you can see, they're bright green. They're also larger than I expected, having just seen the ones at the Rococo Garden which looked miniscule by comparison. These are as large and green as a conventional culinary pea. I harvested these when they were past their best for eating, because I'm planning to save them for next year's seed, but I tried a couple (raw). They have a distinctive and unusual flavour, I'll say that for them. Kind of slightly nutty and mealy, and not massively pea-like, but still sweet and pleasant. Something quite old and earthy about them, but I mean that in a nice way. They don't have the exquisite flavour of Alderman, but then Alderman is an altogether superior pea on every level and I bow down before it.
I'm beginning to think my destiny here is to run some larger scale and more scientifically rigorous trials of purple-podded peas. The thing is, they've only just started appearing commercially in the last couple of years and are still something of a novelty ... so most of the ones you come across in catalogues are just called Purple Podded (the only named variety I've seen is Ezetha's Krombek Blauwschok). But the big differences between mine and the one in the Rococo Garden clearly shows they aren't all the same variety. Some are advertised as having purple flowers, others pink, others bicoloured. Mine have large sweet peas while the Heligan vegetable book describes their purple-podded peas as "virtually inedible". So I'm going to buy up a selection of purple-podded varieties from anywhere I can find them and grow them all together next year for comparison. See how similar or different they really are.
I also had the pleasure of briefly sampling Champion of England both in pea and mangetout form. Both were sweet and yummy eaten raw. I only have four plants though, so I'm having to keep most of the peas for sowing next year.
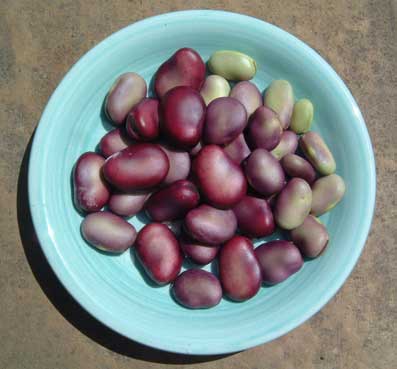 Grando Violetto needs to reach full size before the beautiful colour develops
Remember I put my Grando Violetto broad beans down as a crop failure? Well, this is what I salvaged from the blackfly encrusted stumps I finally slung in the organic recycling bag. Not bad from only four plants, and I'd had a couple of meals' worth off them already. They taste very nice indeed, and have a pleasantly sturdy texture a bit like butter beans. But this one isn't on my favourites list I'm afraid. The beautiful purple colour in the beans doesn't develop until they're fully mature and therefore past their prime for eating, so you really have to eat them while they're green and look like any other broad bean. Though you can dry them ... which turns them a lovely velvety purple black colour. The plants have no blackfly resistance at all, which makes them less than ideal for organic conditions.
Moving on to the climbing beans ... ooh look! Mrs Fortune's, which I had branded the ugly duckling, has produced pods with mottled blue streaks!
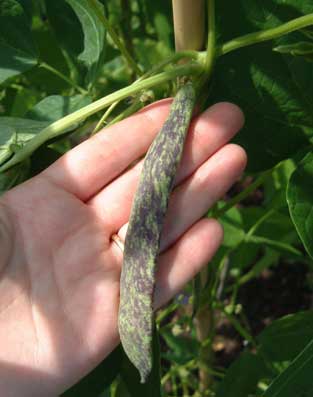 They're a proper blue too, and colour up best in sunlight ... very decorative indeed.
They start to go a bit knobbly as the beans develop, some pods are wider or knobblier than others, and most have a little curved 'tail' at the bottom. It's also a high yielder. The pods seem to form almost as quickly as you can pick them. So we had some for tea, cooked as 'green beans'.
Before I go any further I should point out that some climbing beans are optimised for eating whole as young pods and others are best left to mature as dried beans. If a variety is good for one usage it's generally less good for the other. I think Mrs Fortune's is bred for dried beans, not for eating fresh.
So ... it isn't perfect. The colour vanishes completely on cooking, even with just a light steaming. *sniff*. The pods have a slight roughness to them after cooking, but a very soft texture when you eat them. The flavour is ... um ... not bad. A bit nondescript really.
Kew Blue on the other hand is meant as a pods-an'-all fresh bean, and it's very swish. Mine is now starting to set pods in great numbers, and they're dead straight (when young at least), velvety and very slender. They're a dark purple colour with a flush of green in the younger pods. They look much more elegant than the pods on my other purple bean, Trionfo Violetto, and I have to say they trump it for taste too. I had some steamed this evening, and they were sweet and lovely. Very fine indeed. The colour changes to dark green after cooking, and they have a very nice texture. I think I can recommend this variety if you want beautiful plants and super-tasty pods ... it looks to me to be the best of the climbing beans I've grown. As far as I know it's only available from the Heritage Seed Library.
Next up ... spud reviews.
Sunday, 9 July 2006
More waffle about my pea breeding experiment
 Mr Bethell's Purple Podded
I did some more pea hand-pollinations today as the weather was favourable. The strategy with this batch is to emasculate and pollinate the flowers today and then go back and give them another pollen dusting over the next day or so. I'm hoping this might increase the success rate a little, although I've now looked it up in a book and it seems that the female parts of pea flowers mature earlier than the males anyway, so the stigma should be receptive whether it's pollinated the same day as emasculation or not. But it's worth trying different strategies. I needed something to mark these out separately from the ones I've already done, and didn't have any more string. So I've been tying these with some gold braid I found in my sewing box, which is a bit extravagant, but it certainly looks very pretty.
Slight problem though ... I'm running out of Alderman buds. This variety was sown a while before the others and the plants are coming to the end of their flowering cycle. I need to ensure I get enough successful pollinations to produce seed for the next part of the experiment. Luckily I don't need many ... even half a dozen viable seeds would be enough to proceed with. But I do have to ensure I end up with something ... otherwise I'll have to start again next year. I managed to pollinate five buds with Mr Bethell's Purple Podded. And to increase the chances of getting something useable I also pollinated a few buds of Mr Bethell's Purple Podded using Alderman pollen, i.e. the same cross but with the parents the opposite way round.
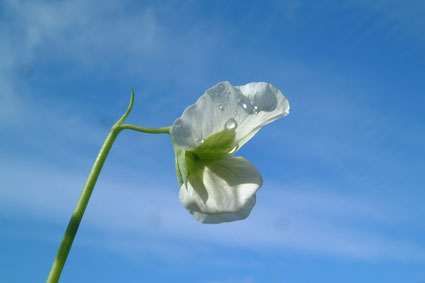 Alderman flower
There is a good reason why I've only used Alderman as the 'mother' plant until now. Alderman is a true-breeding green-podded variety; it has no trace of purple whatsoever. So if I hybridise it with a purple variety and grow the seed, and some of the resulting plants are purple, I will know for certain that those plants are the result of a successful cross. If some of the plants turn out green, I can probably assume they were the result of the bud having self-pollinated before I got to it. This is because the gene for purple colouring is dominant, so I am expecting all the plants of the first (F1) generation to be purple if they crossed successfully (I can't be 100% sure about that, since other unknown factors may turn out to screw things up, but it's a reasonable assumption at this stage). Being able to accurately identify the successful crosses in the F1 generation will save me time and heartache.
Genetically there's no difference between an Alderman x Purple Podded and a Purple Podded x Alderman cross. They should both yield the same results in subsequent generations. But if I use the purple podded variety as the mother, it's harder to recognise the offspring. All the plants grown from its seed will (theoretically) turn out purple, regardless of whether it crossed with itself or with Alderman. The green-podded gene carried by Alderman is recessive so I wouldn't expect to see it at all in the F1 generation. I would have to rely on other factors to identify the successful crosses by looking for other Alderman attributes, which may or may not be apparent (in which case I'd have to grow out the next generation where the various genes will begin to segregate). If the F1 generation turns out to be purple with big fat sweet-tasting peas, or has white flowers, then I can assume it's a successful cross with Alderman. If it doesn't, I'm none the wiser.
So that's why I've only used Mr Bethell's Purple Podded as a 'father' until now. But the shortage of appropriate sized buds on Alderman means I now have to hedge my bets a little.
Doing the cross in reverse today has really shown me how variable pea buds are in their maturity. I said in my earlier post that the buds were about right just as the petals began to protrude from the sepals, but that's only a starting point. In search of Alderman pollen I cut into a young bud which was only just starting to open ... only to find the pollen was all spent. The stamens were withered and the only traces of pollen were white and dusty and useless. Clearly Alderman buds complete their pollination process long before the flowers open, and I had to open up some very small buds to find any viable pollen. Conversely, Mr Bethell's Purple Podded still has copious amounts of pollen when the flowers are fully open, and may even still be viable as the flower dies off. This makes all my hand-pollination efforts a matter of trial and error ... because I don't really know which buds are going to work best. That's why I'm doing lots of them.
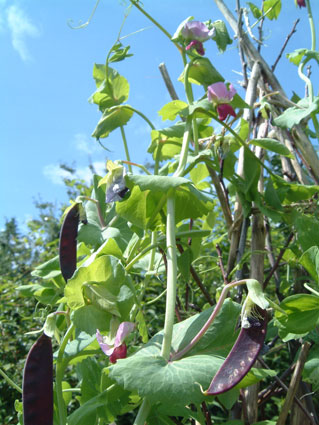
Also today I sowed some more Alderman seeds in my trusty bog roll tubes. Sowing peas in July? Well, in a sheltered garden within Cheltenham's benign microclimate I think I can get away with it. I would also like to sow at least a few seeds from my hybrid experiment this year if they mature in time. That would mean I could start next year with an F2 generation, which would be perfect. The F2 generation is the one where all the interesting stuff starts happening as the genes from the F1 start to separate out into various combinations. That's the one I want. The purpose of the F1 generation is solely to produce as much F2 seed as possible. So if I can do that before September then so much the better.
I'm partly growing more Alderman because it's lovely and I want to eat it, but also because I want it for backcrossing. Assuming I do sow some of my F1 seeds this year, one of the things I'll want to experiment with is hand-pollinating some Alderman buds with the F1 hybrid pollen. The resulting cross will be a quarter Mr Bethell's Purple Podded and three-quarters Alderman. And if I select any that are purple, and then do the same again (backcrossing them with Alderman) then within a few generations I should end up with a plant which is essentially Alderman but with purple pods. If it works, I could have one of the most beautiful and tastiest pea varieties around.
Subscribe to:
Posts (Atom)