Thursday 29 April 2010

Sowing potatoes from TPS

Salad Blue potato flowers
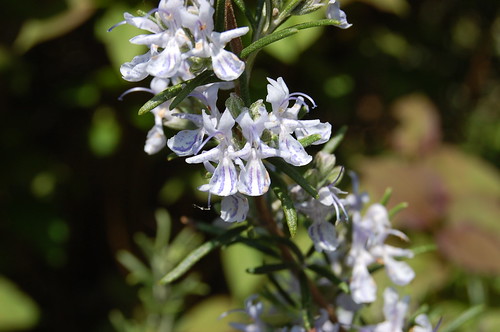
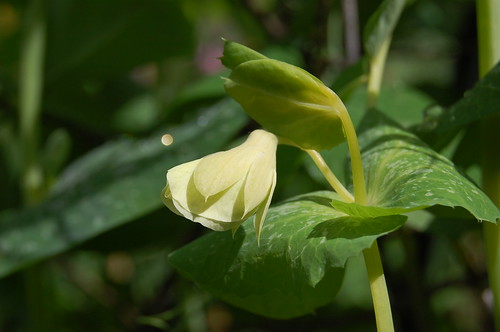
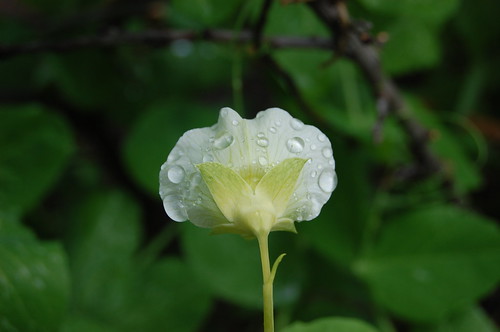
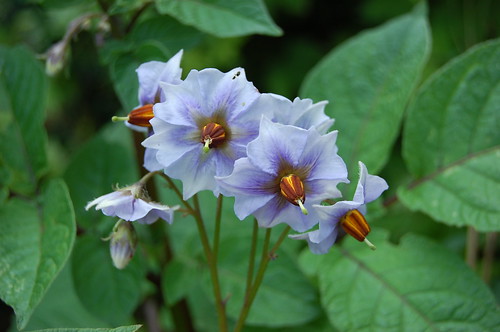
Flowers of Salad Blue, one of the few potato varieties which produces copious quantities of true seed.

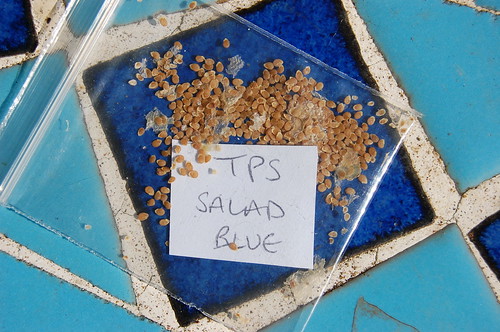
I have a very exciting new project underway. My good friend Patrick sent me some true potato seed - generally called TPS - from legendary potato-tomato breeder Tom Wagner. Tom was the founder of TaterMater Seeds in the 1980s, is the creator of the Green Zebra tomato and various others which are now ubiquitous in seed catalogues, and now dispenses his wisdom on the TaterMater messageboard. These potato seeds are from various hybrid and open-pollinated lines in Tom's ongoing breeding work and it's a real privilege to have them.

Not many people grow potatoes from TPS, and there's a few reasons for that. It's not as quick and easy as chucking a few shop-bought tubers in the ground … although the long term rewards are greater. The seeds are not readily available either. I've never seen them for sale anywhere, and you generally have to save your own.

First I should explain what I mean by true seed. When you buy a bag of spuds for planting, they are normally sold as seed potatoes. But it's a bit of a misnomer really. A seed potato (i.e. a tuber) is a root cutting - or clone to use the US term - of the original plant. Tubers are genetically identical to each other, as they only reproduce by mitosis - that is, they are a vegetative extension of the parent plant. Although spontaneous mutations can and do happen, they're uncommon enough that you are pretty much assured of getting a harvest that exactly matches the tuber you planted.

TPS is not the tuber, but the actual seeds - which come from the plant's flowers and fruits. As seeds are produced by sexual means, a coming together of egg and pollen from different flowers or different plants, they represent a genetic recombination. In other words, they are not genetically identical to the parent plant. They are newly created individuals.

If you sow these seeds they will grow into unique new potato plants, and produce their own tubers. The tubers will be small the first year, and will need to be replanted the following season to produce decent sized yields. So it takes two years, but then you go on growing it from tubers as you would any normal potato, and you effectively have a new variety. Potatoes raised from true seed are generally free of virus and disease (at least for the first couple of years).

True potato seed, Salad Blue
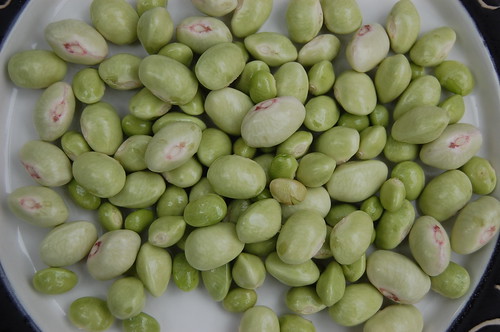
True potato seed, extracted from the berries of Salad Blue. The seeds look rather like tomato seeds, but smaller and smoother.

Potato varieties don't come true from seed, so you never know exactly what you're going to get. Conventional wisdom has it that any plant that doesn't come true from seed is not worth sowing. But to me, and probably most people reading this blog, the unpredictability is exactly what makes it interesting! Even if you sow seeds which were self-pollinated, you can end up with a lot of variation.

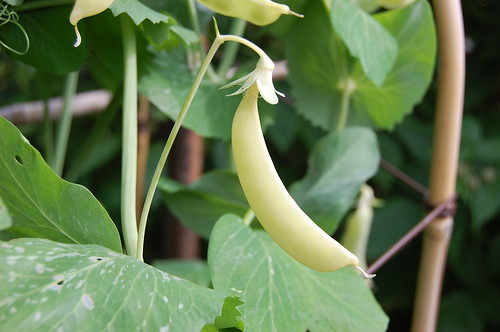
A lot of people don't realise that potatoes produce fruits, for the very good reason that most of them don't. Domesticated potatoes have got so used to reproducing through root cuttings - tubers - that they can't be arsed to make viable flowers any more. Some don't flower at all, while some make flowers with sterile pollen, and the flowers just drop off. But every now and then you will find plants which set berries. It's mostly a variety thing, although environmental factors also play a big part. The berries look like small green tomatoes, sometimes with a blush of blue or purple. Some potato varieties produce berries very freely. Salad Blue (pictured above) is a prolific and reliable berry bearer. As is Mayan Gold below.

Mayan Gold potato seedballs
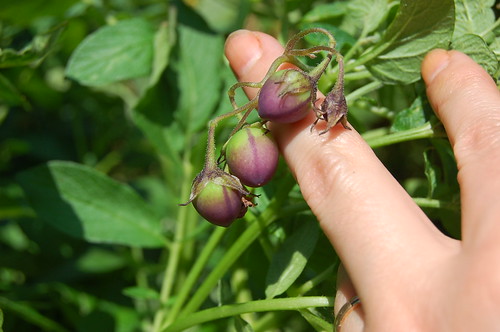
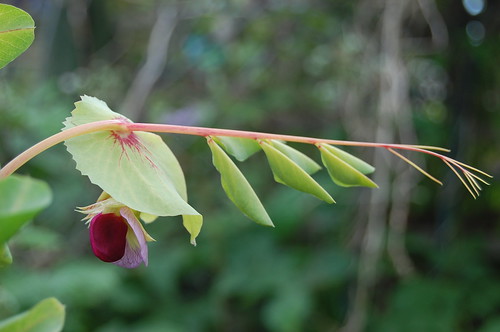
Potato berries on Mayan Gold. This variety is a hybrid of Solanum phureja, a little different from yer common or garden spud, which is Solanum tuberosum. The berries are slightly strawberry shaped - indicating that this species is diploid - whereas most potato berries are more rounded, but the same principles apply.

I'll leave the explanation of extracting and saving TPS for another post, as there are no berries around at this time of year. I will also hold off giving a more detailed genetic explanation, as I'm still on a learning curve with that myself. But what I should explain, briefly, is the reason potatoes grown from TPS are potentially so variable.

The cells of most plants (and humans for that matter) have pairs of chromosomes, in which each gene is inherited in a simple either/or relationship. This arrangement is known as diploid. When a diploid organism reproduces, each parent contributes a single chromosome, and the two join together to make a new chromosome pair. Somewhere along the line, nature had a bit of a freakout with potatoes. Instead of reducing down to one chromosome per parent, an unreduced pair of chromosomes managed to get it together with another unreduced pair. The result is a tetraploid - an organism with four chromosomes instead of the usual two. This basically means it contains two complete genomes - and twice as much genetic material.

Most of the potatoes we know and love today are tetraploid. Although it's a freak of nature, it's quite a beneficial one as tetraploids tend to be bigger and more perfectly formed than their diploid equivalents. If you're interested in how it works and why it's useful, I recommend the Polyploidy Portal for a readable explanation. For the benefit of this post however, I'm going to simplify it to its most basic level. When you make crosses with a 'normal' diploid species, the potential genetic recombination at each allele is very like what you would get if you toss two coins. Plenty good enough for some interesting combinations. With potatoes, however, it's more like the effect of tossing four coins. An exponential increase in the number of possible outcomes. This is why potatoes are so variable when grown from true seed! It's a genetic pile-up bursting with magical possibility.

Mandel x John Tom Kaighin F1
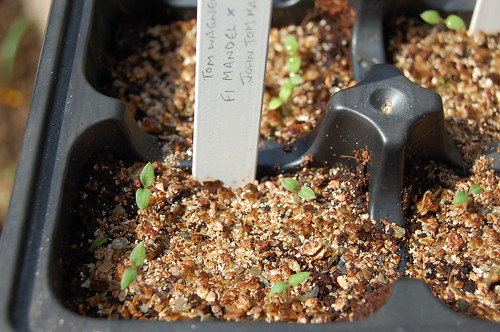
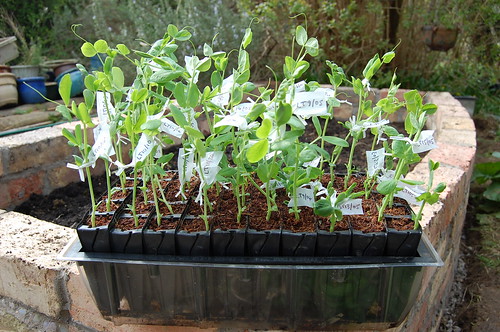
TPS seedlings from Tom's seeds. These are an F1 hybrid between Mandel, a Swedish potato renowned for its flavour, and Tom's own variety John Tom Kaighin, which has been bred for flavour and blight resistance. Neither of these varieties is readily available in the UK. There is a good chance of some excellent flavoured spuds from these seeds, most likely with yellow skin and yellow flesh, and some fingerling types.


How to sow TPS
When Tom Wagner visited the UK last year he gave a lot of advice about how to grow potatoes from TPS. Much of this was captured in a series of videos which you can watch or download on Patrick's blog. What I'm attempting to do here is distil some of Tom's basic instructions into text form - but you can find a lot more detail (including a demo of how to extract the seeds from the berries) in Patrick's videos.

TPS can be sown in spring from mid-March onwards, in any kind of tray or module, and any kind of seed compost. It doesn't need to be a deep module. In this respect, TPS is the opposite of peas. I sow my peas in deep containers so that they produce a deep root run. With potatoes that isn't what you want, because the aim is not to produce lots of root under the seed, but to earth up the young plant as it grows and encourage it to produce roots along the stem. So effectively, you are encouraging the roots to develop upwards rather than downwards!

Potato seeds are small, and so are the emerging seedlings. So you don't want to bury them too deeply. Sow them thinly on the surface of the compost and either press them in or give them a very light covering. I used vermiculite to cover mine, as it helps to keep them moist. Even then I used only a tiny sprinkling, and scooped out the very fine, dusty vermiculite from the bottom of the bag where there are fewer big chunks.

Once you have sown the seeds, keep them warm and damp. As with all small seeds, it's safest to water them by lightly spraying the surface of the compost or using a very fine rose on a watering can. If you're not careful you can wash the seeds away. You can put the tray in a polythene bag or under clingfilm to keep the moisture in, but Tom doesn't recommend this as it increases the likelihood of mould forming on the compost.

Bolivian landrace hybrid F3
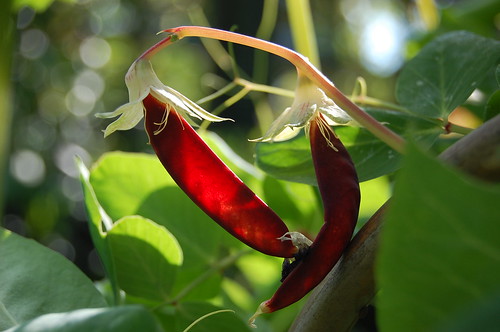
Another of Tom's hybrids which I'm growing at the moment. This is an F3 from Pirampo x Khuchi Akita. These are Bolivian landraces whose tubers look quite different from modern conventional potatoes … in fact I've never seen anything like them in Europe, so I'm very excited by the possible diversity in this hybrid. Pirampo is pink, and Khuchi Akita is purple skinned and crescent-shaped. Tom made this cross to introduce a bit of historic diversity into the potato genepool. The parent landraces are diploid, but can be crossed with other potato varieties to make tetraploids with lots of diversity.

Most of the seedlings will germinate in 5-10 days. But it's not necessarily a bad sign if they take longer. Like tomatoes, they can be fickle about germinating, and will pop up when they decide the time is right - sometimes weeks after sowing.

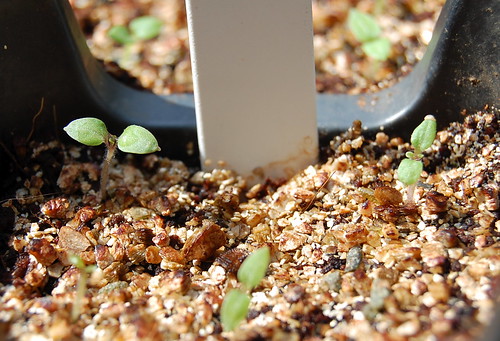
If you're used to the big chunky shoots that potatoes produce when grown from tubers, you may be surprised - alarmed even - at how small and delicate the TPS seedlings are when they emerge. Although they look similar to tomato seedlings, they are significantly smaller. Have faith - they will grow!

Something else they have in common with tomatoes (and peppers) is seed husk retention. Some seedlings emerge with the seed husk still clamped over their heads. You don't need to worry about this though, because potato seed husks are paper thin, and much less of a problem than the tougher tomato and pepper husks. As tiny as the seedlings are, they will soon tear their way out of their helmets without any need of human intervention.

Potato seedlings need sunlight
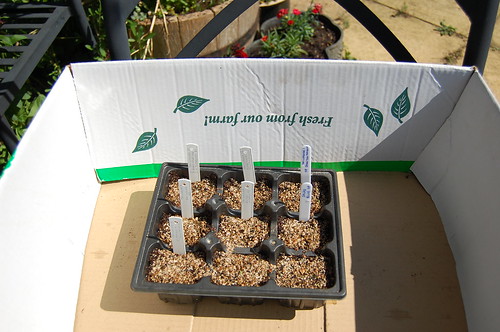
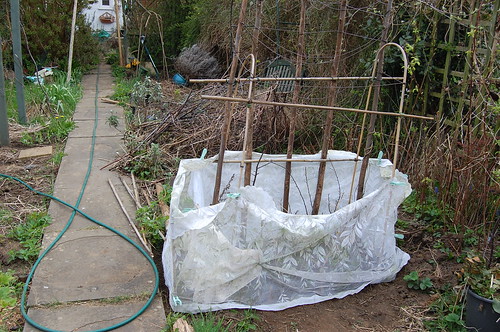
My tray of potato seedlings enjoying a bit of outdoor sunbathing. As they are still young and delicate, I put them in a box to keep the wind off them.

One piece of advice that Tom wanted to make very clear is the importance of sunlight on the young seedlings - by which he meant direct outdoor sunlight and not a greenhouse or sunny windowsill. The reason for this is that potatoes evolved in a part of the world where light is very intense and the air very thin, and so they are dependent on the ultraviolet light that can only be got from direct exposure. If there's a day when the sun is shining (and of course that is a big 'if' in the United Kingdom, but never mind) it's worth putting the potato seedlings outside in the sun, even just for a couple of hours. That way, they develop into strong sturdy plants rather than stretching out and going leggy. However they are still quite delicate at this early stage in their life cycle so you need to stop the spring winds from blowing across them. Placing the seed tray in a larger box, as shown above, should give them the protection they need while still allowing them to sunbathe in the open. If the weather is rubbish when the seedlings emerge, well, there's not a lot you can do about that, but it's a case of making the most of whatever sunlight there is.

I'm going to deal with transplanting in a later post, when my plants reach the appropriate stage and I can take some photographs. In the mean time, I can grow them in these modules until they're a couple of inches tall. The principle of transplanting is the same as that for tomatoes … they benefit from being transplanted at least twice and being buried up to the top set of leaves each time. Because potatoes, like tomatoes, are very efficient at producing feeding roots along their stems. This is, of course, why tuber-grown potatoes are earthed up as they grow. Although the TPS seedlings are tiny, the earthing up method is still the most effective way to grow them.

More anon.

Looking to grow a potato variety that is available in the UK and likely to set berries?
This list is based on a quick search of the European Cultivated Potato Database, but don't rely on it too much. The ECPD takes its data from available research - but you may find differences when you grow the spuds in your garden!

If you want a good chance of berries, try these varieties:

Cara

Desiree
Marfona
Maris Bard
Maris Piper
Mayan Gold
Pentland Dell
Salad Blue
Valor

Sunday 25 April 2010

Garden gallery: some of the herbs I grow

Chocolate peppermint
Chocolate peppermint, a variety of Mentha piperita. I love peppermint, it's my favourite of all the mints for flavour and for medicinal use. I'm always a little sceptical of 'flavoured' herbs, because some of them really are rubbish and don't taste anything like their names suggest. We would get Pomegranate and Ginseng thyme or Oak-Smoked Cheddar and Somerset Raspberry basil if somebody thought they could make a quick buck out of it. But Chocolate peppermint is good. It doesn't really taste of chocolate of course ... the name is partly for the warmly chocolatey stem colour and partly because the sweet, clean, intense flavour evokes the taste of After Eight mints. But it's tasty enough that I eat the leaves straight off the plant. Love it.


Lemon variegated thyme
And another of the flavoured herbs which stands out for me. This is Lemon Variegated thyme, more properly known as Thymus pulegioides Aurea and a product of Thymus x citriodorus. It has large rounded leaves of a deep green with bright yellow margins. I always thought the golden variegated thymes were bred for ornamental rather than culinary use, but this one is a corker. The lemon taste is sharp, intense and well developed with no bitter herby undertone, and a little goes a long way when you cook with it. I have two other citriodorus thymes: Lemon Curd, despite its enticing name, has an uninspiring flavour while Doone Valley, another golden variegated one usually sold as an ornamental, tastes better ... but neither of them are in the same league as this one.


Silver Spires rosemary
Silver Spires rosemary. This is a silver variegated rosemary bred by Christine Wolters of Mayfields Nursery in Guildford. I keep reading that silver variegated rosemary, which was prized in England in Shakespeare's day, has been lost and no longer exists. Well I have it, and it certainly does exist. I bought the plant in 1997, and salvaged it from my old garden when I moved, but haven't seen it anywhere since. Shame, because I rate it highly for looks and flavour. There is a golden variegated rosemary which is more readily available, but this one is quite different.


Italian thyme
More thyme. This one is an unknown variety, but I've had the plant for many years and it's the best culinary thyme I've ever found - very intense, refined flavour and dries exceptionally well. I've never seen it in garden centres. It has fine, narrow greyish leaves and grows taller than most popular thymes ... the leaves are looking quite green at the moment because it's on the cusp of flowering. The plant originally came from Waitrose, of all places. It was being sold as a fresh organic herb, the idea being that you don't bother to plant it, just take it home for the windowsill and murder it for this week's dinner. But I did plant it, and it thrived. It came from an organic farm in the Dolomite mountains of Italy, and that's all I know.


Rosemary blossom
Rosemary blossom. One of the joys of this time of year, and the bees think so too.

Luna Trick F4 seedlings go forth

Luna Trick F4 seedlings
Luna Trick F4 plants all tagged up and ready to plant out

Well both my F4 Luna Trick batches are now planted out in the garden - the standard version and the sugarsnap version. They were sown a couple of weeks apart, in the hopes that their development will be staggered somewhat and I will be less overwhelmed by the workload. Growing peas is not in itself much of a workload … they are independent little dears. But breeding projects have a habit of being very time-consuming, especially this one, because I'm being very careful about collecting individual data on each plant. It takes a lot of effort to label and track every single plant in the project and write down detailed notes for all of them. But it will save me time in the long run because I will be able to select more precisely for the traits I want - and it will teach me a lot about the genetics involved, and pea genetics generally. By labelling every plant with its own number, which includes a code for its specific pedigree, I can identify which lines are true-breeding for dominant traits such as tallness. I'll be able to see which pedigree lines are entirely made up of tall plants and save seed only from those, which should eliminate unwanted recessives very quickly. If I pooled the F4 seed and selected from the whole group, I wouldn't know which of the tall ones were hiding unwanted recessives. So although it would save me a lot of note-taking for this year, I'd be weeding out unwanted dwarf types for years to come.

Luna Trick F4
Luna Trick F4 plant, photographed today. This one is the offspring of LT10, which so far looks to be the only line which is true-breeding for tallness.

As these plants are so important to me, I take extra care with them. They have been raised in rootrainers, which in my experience are far more reliable than any other method for producing strong seedlings and healthy plants. The expense of rootrainers doesn't necessarily make them a good option for pea cultivation generally, but for me they are a worthy investment. The next important thing is soil preparation. I don't bother with fertilisers because peas don't really need them … they have a unique mechanism for producing their own. But what they do benefit from is a digging in of organic matter of some kind. Compost is good. Horse manure is excellent, but in the light of the disgraceful aminopyralid poisoning of Britain's grasslands, I'm not using manure in my garden at the moment. Removal of perennial weeds such as couch grass root is also important, because it's difficult to weed around peas once they get established.

The other special care I provide them with is protection from the weather. Peas are hardy, and I'm not at all worried about the April frosts. The cold nights we're getting at the moment are bringing out some lovely red colour in the leaves of peas capable of producing red colour (which Luna Trick isn't) but it's not harming them in any way. What peas do suffer with though is the cold blustery winds that are so common at this time of year. Having said that, this year has been astonishingly warm and settled, so it hasn't been an issue. They are only really vulnerable to this when they're young and first planted out … the cold winds wither and damage the young growing tips. Once they've got established after a couple of weeks, they are a lot more robust. So what I do for precious peas when first planted out is set up a netted fabric screen round them. Horticultural fleece is the conventional choice, but the lovely old lady who lived in my house before me has saved me ever having to buy any. The house was festooned with about 30 miles of net curtains, which do an admirable job in taking the edge off the winds without losing too much sunlight. I'm growing Luna Trick in a frame made of bamboo canes, so it's the work of a moment to attach the net curtains round it with clothes pegs. I do have to be careful to lay a few unwelcoming heavy twigs around the outside as well, because my cat finds it amusing to charge into the net curtains at high speed.

Protecting pea seedlings the cheap way
Doesn't that look grand? Well all right, it looks bloody awful, but old net curtains are very effective at filtering the English spring breezes while the seedlings get established. I make no apology for the state of my garden ... the breeding and heritage conservation work is so time consuming I don't have time to make it look pretty as well.

I keep each of my breeding projects in their own personal filing containers, made from ultra high-tech re-used cat food boxes. When I picked up an empty box the other day for a new project I'm starting, it turned out not to be empty. Rattling around inside were about a dozen lovingly sorted and labelled bags of Luna Trick seed from the best of my F3 lines, and three unmarked whole pods left loose in the box. I'm afraid I do have this bad habit of failing to label things and then forgetting what the hell they were. These seeds were all harvested earlier in the season, when I was selecting the best plants and harvesting the pods as they matured. I remember harvesting them but don't remember shelling them and boxing them up, which serves me right for smoking too much weed in my youth. There were about twelve pedigree lines in labelled bags, including a load of extra seed from my best plant LT10 … so I've sown another fifteen of those. You can never have enough LT10 as far as I'm concerned. And by starting off another batch of them now, in addition to the ones sown about a month ago, I'm greatly increasing my window of opportunity to make crosses with them.

The loose pods were something of a mystery, but there had to be a good reason I kept them separate instead of bagging them up like I did the others. According to my pollination records, which can also be a bit sporadic when I'm busy, I did some crosses between the best Luna Trick F3 plants and one of the trial varieties I grew in 2009, Buerre Cosse Rouge. This latter is quite a special little variety because it has red-sploshed pods … not quite the deep consistent crimson I got in my red-podder project, but reasonably close to it. And it's a sugarsnap type. It does have some frustrating weaknesses though. The plants (in my trial at least) were tiny and not very strong, and the yields absolutely miniscule. It produced miniscule pods that have about three peas in them, and more often than not they withered and fell off before they reached maturity. I didn't even get to taste Buerre Cosse Rouge, because I was struggling to scrape together enough seed just to regrow it this season. In doing these crosses, I had in my head the idea that I might get some red-pod gorgeousness into the voluptuous sweet abundance of Luna Trick. There is a chance - only a chance mind - that these loose pods had been kept separate because they were hybridised ones.

Fortunately for me and my slack incompetence, I should be able to find out fairly quickly. My old friend gene A will help me out. It's the gene which switches on the colour pigment in peas. Luna Trick doesn't have it - it's true-breeding for the recessive a a genotype which cannot produce anthocyanin pigment. Buerre Cosse Rouge presumably has the dominant A A type, because it has lots of anthocyanin colour. Crossing the two will give me the a A genotype, in which the recessive colourless gene gets elbowed out. In other words, if the seedlings show any trace of red colouring, I will know they are from a cross. If they turn out to be the normal unpigmented Luna Trick type, then I'll know they weren't from a cross. Thus nature sometimes forgives us for poor labelling.

(The seedlings have now emerged and so far are not showing any obvious traces of anthocyanin. Arse!)

Saturday 17 April 2010

The herb garden resurrected

Building the wall

I've finally got round to doing something I've meant to do ever since I moved here in 2004 - install a proper herb garden. In my previous garden, which was a miniscule 30ft by 12ft, I didn't have room to grow many vegetables and so herbs were my main thing. In that tiny garden I collected 80 varieties of herbs - culinary, medicinal and shamanic ones. But over the years most have been lost, either by dying off or having to be left behind when I moved. I always intended to make a new one, but it's taken me six years.

Last year a friend up the road had some alterations done in her house which involved knocking two rooms into one, and she said I could have the bricks if I wanted to come round and collect them. As it was an 1890s house and the bricks were lovely handmade ones full of character, I thought they would be perfect for building a raised herb bed. They didn't feel quite so perfect after I'd lumped 140 of them into the boot of my small and very antique VW Polo and made three journeys back home with the exhaust pipe practically scraping along the road - and I was so knackered I stacked them up round the side of the house and didn't do anything with them for a year.

Beautiful as Victorian bricks are, if you've ever salvaged "pre-owned" bricks you'll know what a fun job it is to chisel all the old mortar off them, which has to be done before you can re-use them. But once I'd got enough of them cleaned up, I made this rather nice walled bed. It's five courses high, curved along the front edge, and has enough room for a good collection of plants which will have full sun and good drainage. There's also a border at the back of it which faces south-west, and with the shelter and the reflected light/heat from the bricks it should make another good place to grow some of the more marginal herbs.

New herb garden
The new herb bed planted up with a few things already. Chives, chamomile, oregano and various thymes and parsleys.

Yes, it's a bit amateur and homespun. I've never done bricklaying before (and I don't have a bloke to do this kind of stuff for me) so I just get on with it and hope for the best. I probably shouldn't admit this but I didn't make any measurements or design plans at all. I just laid out the bricks on the ground until I liked the look of them and cut round them to make the outline for the foundations. Then I positioned them all by eye without recourse to tape measure, string-line, set-square or spirit level. What would Geoff Hamilton say? Maybe I'm daft but I'm just not the kind of girl who measures or plans things. Everything I do is improvised. To be honest, the bricks are all so individual and full of subtle variations it would still have looked a bit wonky even if I had meticulously planned everything. So bugger it. I like wonky things anyway.

And as I was building it I suddenly hit on this idea of incorporating this carved stone ouroboros which I've had lying around for years. It dates back to when I was 19 and lived in a farm cottage on a Cotswold hillside (which was freezing cold and infested with mice, before anyone has the word 'idyllic' get anywhere near their head). In my youthful idealism I used to go up the hill and find flat-faced chunks of Cotswold stone, then half kill myself lugging them back to the cottage to carve medieval motifs on them. The hill where I lived, Bredon Hill in Worcestershire, was circled by pretty villages with ancient churches, some of which had spectacular medieval stone carvings in them. The idea was to make hand-made copies of some of these carvings. I can't remember which parish I found the ouroboros design in, but anyway, I spent a happy few days smacking seven kinds of hell out of a chunk of stone until this little chap emerged.

Ouroboros
Ouroboros carving, set with a few bits of coloured glass.

I love the ouroboros symbol. It's a deep alchemical motif which carries the idea of motion within stillness, completion, wholeness, energised balance and eternal renewal of cycles. All good things to have in a garden. For years I've been carrying my ouroboros (and a couple of others I made at the time) around with me and could never decide what to do with it. After all this time it's beautifully and naturally weathered - and it fits into the wall perfectly.

Another slightly more subtle feature in the wall … when I was lumping bricks into the car I spotted a set of fingerprints in one of the bricks. It had been pressed into the clay before it was fired, and thus preserved. Maybe this picture isn't the clearest, but the brick retains every detail of the lines in this person's fingers. Things like this are really precious to me. I love the idea that an unknown brickyard worker imprinted their identity into a housebrick 120 years ago and it still survives today as clearly as if it had been made yesterday. Perhaps it has an added significance to me because my grandfather was a brickmaker. Not that there's anything remotely romantic about that. In fact it killed him at age 37. But these little personal touches (literally) of people long gone from the world are the most special historical treasures to me.

Brickmaker's fingerprints
A brickmaker's fingerprints etched into a brick surface.

That's not the only bit of hard landscaping I've done this week. My neighbour informed me the other day that he is giving up growing vegetables, because "they don't come to anything anyway, it's a waste of time" (speak for yourself, mate) and turfing over his vegetable patch. I find that very sad, but each to their own. I have benefited from it personally though, because he offered me the edging stones which had formerly made the boundaries of his vegetable garden, which happened to be exactly the right size and quantity for edging the path in my greenhouse, for which I had been trying to psych myself up for a trip to Wickes because I was in urgent need of some. These are old tiles and far nicer than anything I could have got from Wickes anyway. Thank you God. Thank you neighbour.*

*Not that the two are in any way synonymous.

Sunday 11 April 2010

Report on the Luna Trick F3 crop


This post comes with a little explanatory video (12 minutes running time) as an introduction to my Luna Trick pea project. It's the first time I've made one of these, so do let me know if it's useful.

Luna Trick is a new pea variety I'm working on. It's an exquisitely tasty edible-podded pea with pale golden yellow moon-shaped pods - named for my music partner Daniel Staniforth who has a music project called Luna Trick.

The project originally started as an attempt to breed a yellow sugarsnap pea. In 2007 I crossed Golden Sweet, a unique heritage golden-podded mangetout pea, with a modern sugarsnap pea, Sugar Ann. The result was a spectacular range of unexpected colour and flavour diversity - but sadly no yellow sugarsnaps. My chance of getting a yellow sugarsnap in the F2 generation was one in sixteen (a double recessive combination), but none showed up in that particular batch. I had yellow mangetouts and green sugarsnaps, but that was it. However one mangetout plant did stand out from all the rest for its elegant beauty, high yields, juicy golden yellow pods and truly exquisite flavour. This plant, which was numbered YSS 25, became the prototype for Luna Trick.

In 2009 I grew out 35 seeds from this one plant. I was hoping to get more plants of a similar type. And so I did - and a lot more besides!

Luna Trick F3 young pods
The first Luna Trick yield. Golden yellow moon pods, exquisitely sweet and completely fibreless.

Hybrid vigour in peas is something I've often wondered about. I've often heard it said that hybrid vigour exists only in outbreeding plants, if indeed it exists at all, which is still a subject of debate. Peas are inbreeding plants - very inbreeding - and so you might expect them not to gain much vigour from being hybridised. However my experience is that peas do have a bit of a wahey in their size and growth when you hybridise them. It varies, but it's usually apparent in one way or another. And it may be the reason why Luna Trick turned out a lot taller than expected.

The parent varieties were 5ft tall and 1ft tall respectively. Under normal circumstances, I would expect most of the offspring to be around 5ft tall, as that's the dominant form - with about one in four defaulting to the recessive 1ft size, and maybe the odd intermediate. As it turned out, the dwarf types were nearer 2ft, and voluptuously chunky. Whereas the tall types - well frankly they didn't want to stop.

Daniel, in whose honour the peas are named, is a big bloke. He's 6' 4". I never thought the plants would get as tall as him, but they did.

Luna Trick F3 outgrows its patron
The F3 crop reaches the same height as Daniel. I wasn't able to measure it after this point because my arms aren't long enough.

Most of the plants weren't going to stop there either. They just kept going, way beyond the 5ft tall frame I'd optimistically provided for them. I had to ram some extremely tall and sturdy poles into the ground all around the frame and wrap masses of garden twine around them to hold everything together. And still the plants kept growing. I couldn't even reach the tops. They were probably a good 8ft by the time they started slowing down.

But apart from this, they behaved very well and did everything I hoped they would do. I'm very optimistic indeed that they will turn out to be a wonderful variety. Not only that, they are TWO wonderful varieties. The original YSS 25 protoype plant was a mangetout type - but growing its offspring revealed the presence of a hidden recessive sugarsnap gene, and a large number of the F3 plants turned out to be sugarsnaps. Beautiful, crescent-podded, golden yellow sugarsnaps! So I got exactly what I had wanted when I made the original cross - in addition to developing Luna Trick as a mangetout type. A wonderful, beautiful and very much appreciated gift.

The key trait in Luna Trick is flavour. I'm aiming for it to have the same flavour as YSS 25, which stood out from every other plant in the F2 batch and was among the most refined mangetout flavours I've ever tasted. Very sweet and juicy, but there's a lot more to it than that - it had a rich and refined complexity to its flavour and no trace of bitterness. YSS 25 was good enough that you would want to eat its full size pods straight off the plant. A salad mangetout, effectively, because it tastes so good raw you really would have no incentive to cook it. I think a yellow mangetout which tastes good enough to include in a salad, even at full size, would be a very nice thing to have.

At the moment I'm getting a mixture of single pods and double pods - some plants produced one or the other but in many cases there was a mixture of both on the same plant. I'm not quite sure how this trait works - it is clearly partly genetic but I'm not sure whether there are environmental factors involved too, or a complex interaction of genes, because it doesn't follow normal patterns and ratios. Consequently I'm just not worrying about it for the moment. Two pods per node is often deemed more desirable but I tend to find that the two pods have fewer peas in them compared to the single ones, so I'm not convinced it actually matters that much either way.

Luna Trick F3 bud
A single flower bud. This is an unusual colour combination in peas - a white flower with a creamy blond calyx (the pixie hat bit).


To summarise the F3 characteristics ...


Luna Trick is stable (true-breeding) for:

Yellow pods - a very simple recessive gene is responsible for this, called gp. In order to express yellow pods, the Luna Trick prototype must have had the stable gp gp genotype. Which is fine by me. It holds only gp genes, so all its offspring will be gp gp too.

There is, however, some variability in how persistent the yellow colour is. One of the weaknesses of the parent variety Golden Sweet is that its pods tend to green up as they reach maturity, so only the young pods are truly yellow. Some of the Luna Trick F3 plants shared this tendency, but others were notable in their ability to stay yellow right up to the time they were harvested for seed. Presumably this is a genetic variable - though I don't yet know how it works - and I will select for it at the F4 stage.

Edible pods - a slightly more complicated trait, as there are two genes involved in the reduction of fibre in the pod, p and v, both recessive. They work in slightly different ways, and you need both of them to get a really good fibreless pod. I have my suspicions that Golden Sweet only has one of them, as it tends to go a bit gristly at maturity. However, Sugar Ann has them both - and now Luna Trick has them both too. There was no trace of fibre in any of the pods in the Luna Trick F3. Hurrah!

White flowers - peas need a dominant gene called A in order to "switch on" anthocyanin production. Without it, they cannot produce any purple pigment in the leaves, stems, flowers, seeds or anywhere else. Luna Trick has inherited the recessive a a genotype from Sugar Ann, and therefore cannot produce colour pigments. White flowers it is then.

Cream calyx - the flowers all have a cream calyx (sometimes with green mottling) rather than the more conventional green. This is a true-breeding trait because it's directly related to the yellow pods. It looks absolutely gorgeous with the white flowers and really gives this variety an extra beauty factor in the garden, adding to its luna blondness.


Luna Trick is still segregating for:

Height - I'm selecting for tallness, which is the work of a dominant gene called Le (internode length). The cross with Sugar Ann will have introduced the recessive type le into the mix. Although the Luna Trick prototype was tall, it had the recessive shortie gene lurking in its genome … and by a simple Mendelian ratio I ended up with dwarf types in about a quarter of the F3 plants. With a bit of luck the F4 generation should take care of this. By growing out several plants from each of several lines, I'm hoping to be able to identify the lines which produce only tall plants, and which are therefore likely to have the desired Le Le genotype.

Pod type - the prototype Luna Trick had large mangetout type pods, which represent the dominant form. However, squirrelled away in its genome was the recessive gene n, inherited from Sugar Ann, which gives sugarsnap type pods. Consequently about a quarter (or just over actually) of the F3 plants were sugarsnaps. I was overjoyed by this, as yellow sugarsnaps were the original intent when I made the cross. The way this gene works is to thicken up the pod wall, giving it its chunky and succulent 'snap' characteristic. To compensate for this thickening, sugarsnap pods tend to be slimmer. Although this genetic difference is simple and made by a single gene, it effectively creates a separate new variety.

The recessive nature of gene n means that any sugarsnap lines I follow up will be true breeding for sugarsnap pods, as they will be genotype n n. The mangetout Luna Trick, on the other hand, will continue to throw up the odd sugarsnap from recessive genes hidden away, and I'll have to eradicate those through repeated selection.

Even within the mangetout type, differences in pod size and shape are apparent. The ideal I'm looking for is a fairly wide crescent shaped pod, but some are narrower and some are extra wide, and some are not quite so crescent-shaped.

Flavour - this is the most important factor, and I would have liked it if all the offspring had tasted as good as the prototype - but only some of them did. I know very little about the genes involved in pea flavour. The combinations are very varied, and so I assume a number of genes have a bearing on it. Sugar content obviously is a major factor, but it's not the be-all and end-all. Some peas taste very sweet but are still quite bland, others have a rich and interesting flavour but aren't particularly sweet. There is also a kind of 'soapy' taste which peas are prone to which seems quite independent of the other flavour variables. The flavour variability in the Luna Trick F3 was quite considerable. They ranged from something akin to nectar of the gods to something bordering on bitterness. Some were just bland. Overall though, the vast majority tasted substantially better than Golden Sweet - and the best ones were truly exceptional. So I'm confident of creating a flavour benchmark with Luna Trick - it's just going to take a bit of careful selection.

Seed colour - the Luna Trick prototype was heterozygous for seed colour, producing both the dominant cream seeds and the recessive green ones. Some of the resulting F3 plants were homozygous for green seeds, but the lines I'm most interesting in following up happen to be heterozygous ones, so the variability will continue in this coming generation. I'm not too bothered about this. I might select one colour or the other if it becomes easy to do so, but I don't see any harm in having the variability. It would be unacceptable in a commercial variety to have mixed cream and green seed, but I don't see why not. One of the compensations of public domain plant breeding is that you're not bound by rules and conventions.


Luna Trick F3 pod
Sugarsnap version of Luna Trick. I will develop this type separately and make a new variety with a different name.

Luna Trick does have a potential weak spot which may be genetic or environmental or a combination of the two. The peas have a tendency to split their skins when ripe - much as ripe tomatoes do when they're over-watered. This isn't a problem when you want to eat them, but verily 'tis a bugger when you are saving them for seed. In the F3 crop, some plants suffered badly from it and some had no problem with it at all. So I am selecting the ones that didn't have the problem - kind of by default, because the ones that have split will not make good seed for replanting. If it's a genetic issue, selecting against it should soon eradicate it. If it's environmental (affected, for example, by how much water the plants get at a particular time) then no amount of selecting will make any difference. So far this seems to be the only flaw though in an otherwise wondrous variety.

Luna Trick F3 bloom
Rain on Luna Trick blossom.

So what now? The F4 crop in 2010
I've already sown 100 seeds for this year's selection work - 50 mangetouts and 50 sugarsnaps - and these are the ones shown in the video above. Germination was 100%.

I'm working on the mangetout and sugarsnap versions as completely separate varieties, and at some point the sugarsnap one will get its own name. Some sugarsnap types will continue to show up among the mangetouts in this generation. I'm also seeing height variability, which is apparent even at the seedling stage.

I've chosen F4 seed from the best six plants of the mangetouts and the best six plants of the sugarsnaps. In the F3 there was one plant, called LT10, which stood out from all the others - it was the tallest, highest yielding, most beautiful and had the holy grail flavour I was looking for. So I'm growing more of those than any other, hoping that I can stabilise it pretty much as it is. But by growing out a few other good lines alongside it, I'm hedging my bets in case LT10 turns out to have any unexpected flaws - and also learning more about the genetics involved, by observing the ratios for different traits in different lines.

With the sugarsnaps, there was no obvious standout plant in the F3. Some were better for flavour, some for pod shape or colour, some for stringlessness ... so I've just selected the six that looked most promising and will see what I get.

All in all though, I'm very excited and optimistic about Luna Trick.

Sunday 4 April 2010

Red-podded pea update: the F3 crop

Red-podded pea F3

The unexpected discovery of the 'formula' for red-podded peas was the most exciting thing to happen in the garden in 2008. Without even meaning to, I'd created something unique and special and was very excited about what it might evolve into. Following all this excitement and expectation, its progress in 2009 was frustrating to say the least.

To recap briefly: I was working with two crosses, both involving a purple shelling pea with a golden yellow mangetout, with the aim of breeding a new purple mangetout variety for The Real Seed Catalogue. One of these crosses was Golden Sweet x Carruthers' Purple Podded, and among the F2 plants (the generation where all the genetic recombination happens) I found one single plant with deepest, richest blood red pods.

Red-podded pea F3

Beauty is not enough though, as spectacular as it is. Commercial seed catalogues are already rife with things which look good but don't taste particularly special. So much so, you could be forgiven for assuming there is a tradeoff between beauty and flavour (which there isn't) and that pretty vegetables will inevitably taste rubbish. I don't want that to happen with my red-podder. I want it to taste as good as it looks, otherwise there really is little point in it.

The original red-podded F2 plant was, unfortunately, a normal shelling pea with a fibrous membrane inside the pod. What I need is an edible podded version - which means a pod which doesn't produce a gristly inner membrane. The absence of fibre is actually achieved by the combination of two unrelated genes, both recessive. Golden Sweet, the 'mother' of red-podder, is a mangetout and has at least one of these genes, if not both. So even though red-podder itself had fibrous pods, there was a pretty good chance that it would be heterozygous at that locus - carrying a hidden recessive gene for edible pods. In fact, by the rule of Mendelian segregation it had a two in three chance of producing some edible pods, and only a one in three chance of being all gristly and inedible. Until I grew the next generation, I had no way of knowing whether it was heterozygous for that trait (carrying some variability) or homozygous (true breeding).

Red-podded pea F3

So in 2009 I grew the F3 plants. As the red-podded phenotype was only really asserted in one plant in my F2 crop, my F3 crop was based solely on the offspring from that one plant. The plants were absolutely stunningly gorgeous. Most of them had deep red pods, though some were coming out as plain yellows, and they all had wonderful rich colouring on the stems and tendrils, and attractive calyx markings. When the sun shines through the red pods they are out of this world.

Alas, growing the F3 revealed that red-podder is homozygous for gristly pods. In other words, it cannot produce edible pods. Homozygosity is a blessing for stabilising the traits you want. But when a trait you don't want is homozygous, you're stuffed. I could grow the offspring of my red pea for the next 100 years and probably never see an edible pod among them. The genes for edible pods are not there. It has only the genes which breed true for solid, yukky, gristly fibre.

There are five things I can do about this:

1. Stand in the middle of the garden and shout "BOLLOCKS!" in a really loud voice.

2. Go back to the F2 generation and grow out the rest of the seeds (I have about 20 left) in the hope of finding another red-podded phenotype but with edible pods.

3. Go back to an earlier generation still, the F1 seeds, and grow out some more of those. These plants will all look the same, all boring, with no red pods. But they will produce a fresh abundance of F2 seed, which I will be able to sow next year and that will give me a much better chance of an edible red-podded phenotype in the event that option 2 above doesn't yield anything.

4. I can switch to another line of F3 seed, even though none of them are proper red-podders. For example, I do have an F3 which is edible podded and produces yellow pods with a red blush. It's possible that if I grow out enough of its offspring I might get something with a stronger red. It should at least breed true for edible pods, which is half the battle. Even if it doesn't produce a decent red, it might make a nice variety in its own right - kind of peachy auburn!

5. I can grow my remaining seed from the red-podded F2 and cross it with something else. To retain the red pods I would need to cross it only with yellow podded peas - and mangetout ones at that. The most obvious thing would be a backcross to Golden Sweet, but I can go one better than that. My Luna Trick line, although not yet stabilised, is bred from Golden Sweet but is a huge improvement on it. A cross with that would give me an excellent chance of improving red podder's flavour as well as its pod structure. The other obvious cross to make is with option 4 above, which already has most of the right genes.

Red-podded pea F3 bud

Apart from option 1, they will all take some time - at least a year and probably more - to get the results I want. But no matter, I have got all of them underway now. We'll see what 2010 brings.

Thursday 1 April 2010

Major Cook's Bean

Major Cook's bean

Some of you may be growing this treasure of a bean this year, as it appeared in the 2010 Heritage Seed Library catalogue - along with a little quote from me because I'm one of the Seed Guardians who looks after this variety. The advantage of being a Seed Guardian meant I got to try it two years before it appeared in the catalogue, and I've already written a detailed review. There hasn't been much point in me promoting it until now because it wasn't available until this year, and I couldn't offer it in any personal seed swaps because the stock I have belongs to the Heritage Seed Library and all the seed I produced went back to them.

If you chose this variety then you are in for a treat. I rarely, if ever, proclaim anything to be the "best ever" or single any one thing out as my ultimate favourite, because there are so many varieties that have merits in different areas, and diversity is in itself a blessing. But this is the exception - Major Cook's Bean is the best bean I've ever grown, and I fell completely in love with it. It is the bean that has everything.

Genuine multipurpose beans are a rarity. In most cases, there is a trade off between pod quality and bean quality, and you have to decide which you prefer when you choose a variety. Major Cook's Bean is an exception. It has the most exquisitely fat succulent pods with a gourmet flavour and absolutely no trace of fibre whatsoever, so the pods stay sweet and edible even when they're fairly mature. At the same time (even on the same plant) you can harvest mature beans which also have a gourmet flavour and a silky texture and which don't break up when you cook them.

Major Cook's bean

The pods are quite curious looking as they have a strong curved shape and are mottled with purple-maroon. To start with the pods are flat and the mottling is quite blue. As they mature they become spectacularly knobbly, and the colour changes to a rich burgundy maroon. What is unusual is that the pods are still delicious after they've gone knobbly. The knobbles are caused by the complete absence of fibre inside, so the pods shrink around the shapes of the beans. The pods are also incredibly thick-walled and juicy, which adds to the knobbly effect even more. They have a strong flavour, but it's sweet and rich and delicious, and the texture is smooth and succulent - and as if that wasn't enough, they are absolutely stringless! Instead of going fibrous when left to mature completely, the inside of the pod develops a soft white layer of fluff, like you get in broad beans, and the outer colour turns almost solid dark maroon.

Like all red/blue/purple streaked pods, the colour is not retained on cooking because the pigment (anthocyanin) is water-soluble. It does turn the cooking water a lovely deep blue-green!

If you eat the whole beans rather than the pods, you are in for another treat. They will stay intact in a casserole and the texture is buttery and silky, and the flavour rich and sweet.

Major Cook's bean
Fresh shelled beans. With the benefit of hindsight, I wouldn't harvest them this young. It's a waste of the good pods. The beans are at their best when fully mature and will eventually dry down to a creamy white with maroon speckles.

As a garden plant, Major Cook's Bean is not the most elegant but it more than makes up for it with its vigour. In my garden it has been completely untroubled by any pests, and although quite a few snails took up residence in its voluptuous foliage they didn't seem to do it any damage. The yields were stupendous. Even without regular picking (since I was growing it for seed I only picked a very few pods before maturity) it produced a totally mad number of pods and kept on going well into the autumn. The leaves are very large, bright green and coarse, and feel rough to the touch. They have large stipules and are prone to composites with four or five leaf lobes instead of the usual three. The flowers are mauve and quite pretty. When the pods are produced and the plants are covered with their burgundy-streaked crescents, they look much more attractive.

The catalogue description gives a little of the bean's history. It was donated to the Heritage Seed Library by Mr Luxton, who got them from his father in 1960. Mr Luxton senior had worked for the Commonwealth War Graves Commission and was given the bean by a colleague, Major Cook. The catalogue suggests this happened in the 1920s but this has now been corrected - it was actually the 1950s.

In my original review I thanked Major Cook "whoever he may be" for his discernment in selecting this bean and preserving it for the future. Well I now know a bit more about who he was. I was recently contacted by his son Phil, who told me this:

"Major Cook was my father. Trained at Kew, London, where he was a Student in 1939. His first job was to train people to grow their own food as part of the war effort. Then he joined up in the Army in 1940, to be sent to various Arab nations on various missions for 5 years.

By 1945 he was a Major. He was tasked by the Commonwealth War Graves Commission with building the Cemeteries in Normandy, France, after the landings, and later to assist in rebuilding the 1st world war cemeteries in France.

Living in Albert, Somme, where Mr Harold “Lucky” Luxton was his right hand man. Also where I and my sister also grew up, from 1952 until 1970. We remember Mr. “Lucky” well.

The bean was probably much older however and could have come from Major H.V.Vokes, who was the first Horticultural Officer for the Commonwealth War Graves Commission in 1920. (He was an uncle of Major Cook). The bean may even be older, in that Major Cook’s grandfather was also an experimental horticulturalist, he was Alderman F. Vokes, Sheriff of Southampton, UK, winner of over 1100 cups/awards for horticulture and there is a flower park named after him near the docks in Southampton."


Major Cook's bean
Major Cook's Bean may originally have been developed by his grandfather, Alderman Vokes

I was intrigued to learn that Major Cook had lived in Albert on the Somme, because it's a place with a very special significance to me. I went there in 1996 during a pilgrimage to the battlefields, originally on the trail of Wilfred Owen who is among my very favourite poets, but it led on to other things. After visiting Albert I had some very strange and powerful dreams, and when I got home it all splurged out in the form of a play set in the WW1 trenches. The play got picked up by a professional theatre producer and premièred at the Grace Theatre in Battersea, London, in 1998. That's my little claim to fame - and for a while it looked like I had a literary career in front of me. Three years later I came out with a novel also set in WW1, with large parts of it set in Albert, but by that time my agent had sodded off (as agents do) and I wasn't able to place it anywhere. But that's a whinge for another day.

What's even more curious is that Phil's message arrived at the very same time I was scanning my Somme slides, as part of an ongoing effort to digitise my archive of film photographs taken during the 20 years before I went digital. I was literally right in the middle of sorting out the Albert pictures.

Albert became an iconic town during the first world war. It was an important strategic base and control centre for British troops, and consequently became a target for heavy bombardment. What was ironic was the town's motto Vis Mea Ferrum - my strength is in iron - adopted during the heyday of its local iron foundry, and which had something of a hollow ring to it by 1916 when heavy iron artillery shells had pounded most of the town to rubble. The basilica in the market square was topped by a gilded statue of the virgin holding the infant Jesus, his arms outstretched, high above her head. In early 1915 the tower was struck by a shell and the golden virgin lurched over, but remained attached to a tangle of metal which kept her suspended over the town square as if she was on a clockspring. She looked as if she was trying to hurl herself and the baby Jesus into the rubble below. Or blessing the chaos, depending how you look at it. It was a deeply striking image which was visible for miles around, and a superstition soon arose that whichever side shot her down would lose the war. Consequently she stayed up - despite more than three years of relentless bombardment in which the rest of the basilica was pulverised. The superstition turned out to be unfounded: it was the British artillery who finally shot her down in 1918 when Albert was briefly taken over by the Germans and there was concern that the tower would be used as an observation post. The statue was never found.

After the war the town was rebuilt, and the basilica reconstructed with a new (upright) madonna. Even now it's not hard to find the lingering scars … pockmarked bricks on the lower walls of buildings everywhere you look.

Somme mural, Albert
The town of Albert, Somme, where Major Cook was based. I took this photo while I was touring the battlefields in 1996. It shows a commemorative mural of the skydiving madonna, and the rebuilt basilica with the new statue on the top.


Golden virgin on the lurch
This first world war postcard shows what the basilica and golden virgin looked like in 1915, after a year of bombardment. You can imagine what state it was in by the end of the war.

During his time in Albert after WW2, Major Cook was superintendant of all the CWGC cemeteries in the Somme area. He gardened on a bombed out factory floor and operated a no-dig system (with compost and chicken/rabbit manure) which kept him self-sufficient in vegetables. He was an accomplished horticulturalist who collected and experimented widely, keeping a careful note of where each plant had come from. Another of his credits is the discovery of the Golden Leylandii, which he found growing in one of the cemeteries as a result of a natural hybrid. He promoted the use of evergreens in the CWGC cemeteries after the wipeout from Dutch Elm Disease.

As for Mr "Lucky" Luxton, whose family maintained the bean for the next 50 years and donated it to the Heritage Seed Library, he was a veteran of WW1 and spent most of his life with two bullets lodged in his chest. He'd survived a pelting of machine-gun fire which had hit him in the chest four times. Two of the bullets were removed but the other two were too close to his heart and had to stay there.

Dantzig Alley
One of the cemeteries formerly cared for by Major Cook and Mr Luxton, photographed in 1996. The CWGC cemeteries are laid out as gardens, with immaculately maintained flower borders along the front of the graves. This is Dantzig Alley cemetery near Mametz, a few miles from Albert. Behind the wall are cornfields which were once the battlefields of the Somme.

My thanks to Phil for making the effort to get in touch and tell me about his father's work.