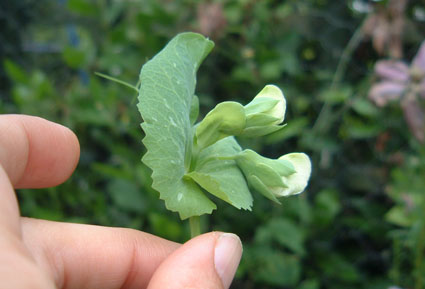
 Two Alderman buds. The top one has reached the very latest stage where emasculation is possible (indeed this one turned out to be shedding some pollen already). The lower bud is just reaching the optimum stage for use as a pollen donor.
This is where the fun really starts, although most gardeners never venture into the world of hybridisation and breeding. DIY hybridising used to be common practice, and many of the best garden vegetables were originally bred by amateurs. But as commercial seed production has completely dominated what we've grown in our gardens over the last 60 years, and saddled us with same-old same-old commercial strains which are optimised for farmers and not gardeners, there are vast areas of potential for developing new and far more interesting varieties. The lost art of amateur plant breeding is way overdue for a revival. And peas are an ideal place to start.
Hand-pollinating peas is not difficult, although it can be fiddly and you have to know what you're doing. But it's a simple enough skill to acquire.
As I said in my other pea-post, I'm experimenting with a hybrid between Alderman, a tall, voluptuous variety with huge and very sweet peas, and Mr Bethell's Purple Podded whose culinary qualities I don't yet know but which produces beautiful pink flowers and purple pods.
I've done my homework on this and what I'm mainly interested in is a dominant gene called A, which is responsible for the production of anthocyanin in peas. Anthocyanin is what provides the purple, red and blue colouring in vegetables, and it also has nutritional value. Given the high proportion of purple colour in its leaves, stems, pods and flowers, it's extremely likely that Mr Bethell's Purple Podded is endowed with the A gene. By the same token I'm assuming that Alderman doesn't carry the A gene, unless there's some other reason why it isn't being expressed, because the plants show no trace of purple. Therefore (and this is pure guesswork) I would expect a cross between the two varieties to yield mostly plants with purple colouring, and the same for about three-quarters of the subsequent generation, because those will have inherited the dominant A gene. I can then select the ones I want and inbreed them for a couple of years to stabilise their characteristics. That's the theory anyway.
I might find that a hybrid between these two varieties results in a simple sharing out of the attributes of the two parents. The ideal would be to have the large succulent flavoursome peas of Alderman with the attractive colouration of Mr Bethell's Purple Podded, and as the colour should be dominant in all the offspring I might get lucky. But there's a complication which makes it a lot more interesting. Although the A gene enables anthocyanin production, it doesn't control where the anthocyanin is distributed. It's nothing more than a gateway for the production of purple colour. There are various other genes which control whether the purple is expressed in the pods, the leaf axils, the flowers, the seeds, or elsewhere. Some may be dominant and some recessive. And I have no idea what configuration of these genes Alderman might have, because without the presence of A those genetic traits are unexpressed. By introducing the A gene into Alderman I'm giving it the ability to produce purple colour but I'm also allowing all those hidden genes to express themselves and I may get some surprise results in which bits of the plant actually go purple. That's all part of the fun.
Let me stress that you don't need to do any genetic research before you make a hybrid. I just do it because I'm a nerd. You can choose your parent plants randomly or intuitively and just see what comes out. Even when you do take the trouble to research the effects of particular genes there always seem to be surprises in the results, because it's largely guesswork at the best of times.
OK, that's the theoretical basis for my hybrid. If you were bored stiff reading all that then don't worry, the practical bit is coming up.
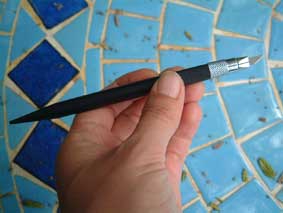 To make a hybrid, you have to bypass Nature's usual mechanism and pollinate the flowers by hand. You don't need any specialised tools, but I've found the ideal implement in my art box. I'm originally a graphic designer by trade and although I've been doing it all on Apple Macs for the last 14 years I still feel the need to keep an old-fashioned artist's scalpel on my desk. This one is ideal, because I can use one end for slicing open the flower and the other end to poke petals apart and transfer pollen very precisely. Being plastic, the body of the scalpel has a slight static charge (especially when rubbed) which helps the pollen to cling to it.
Peas are rampantly self-fertile and shed their pollen at quite an early stage in the flower's development. That means you have to do a hand-pollination very early on in the bud stage. If you leave it until the bud is almost ready to open it will already have self-pollinated and you won't get your hybrid. On the other hand, if you do it too early the female stigma may not have developed enough to be receptive. The ideal stage of bud development varies with the weather, variety and time of year, but as a general rule you should use buds which are only just starting to show the tips of their petals (see photo). Sorry a lot of my illustrative photos are rubbish. I really need three hands to photograph the pollination technique properly, so I'll get my friend Caroline to help me do some better snaps at some point.
 This Alderman bud hardly looks like a bud at all ... the petals haven't even begun to emerge from the sepals. But it's just about at the right stage for hand-pollination.
The first step is to pull off (or at least pull right back) the sepals, which are those green leafy bits around the outside of the bud. With those out of the way, the bud comprises a double layer of petals. Gently fold the two layers right back and hold them in that position, but don't remove them. This will reveal the flower's inner sanctum, known as the keel, which is a sealed petal-bag containing all the reproductive bits. At this stage you will see why it is that bees don't get a look in with pea flowers. Under normal circumstances they're completely inaccessible.
Being very careful not to cut too deeply, slice open the keel and remove or peel back as much of it as you can. Inside you will find ten stamens (that's the little stalks with yellow blobby bits on the end) and a style, which is the extra long stalky bit. Depending on how far developed the bud is, the stamens may have grown right to the end of the style or they may be a couple of milimetres shorter. Shorter is better, because it's less likely that any pollen will have reached the stigma, which is the receptive spot on the very tip of the style. Still with me? Good.
If the yellow blobby bits (anthers) have started to release pollen, even in small amounts, it's too late to do the cross. Try again with another bud at a slightly earlier stage of development.
 Here the keel has been cut open and you can see the anthers (yellow blobs) inside.
Before you do anything else, you need to emasculate the flower with either scalpel or fingernails (sorry boys, I know it makes your eyes water just thinking about it). Or to put it in layman's terms, you have to whip off all the yellow blobby bits. They usually pop off quite readily when gently scraped with a scalpel blade. Make sure you remove all of them.
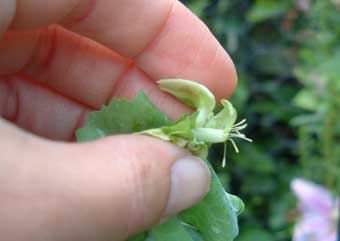 The emasculated bud. Those frilly bits are the stamens after the anthers have been removed.
 What you're left with is the female reproductive part of the flower, i.e. the style. The receptive part (stigma) is right at the very end (not to be confused with the little bristly bit just below the tip). That's the bit you need to pollinate. So now all you need is pollen.
On whichever variety you are using as the 'father', you'll need to find a suitable bud as a pollen donor. The exact development stage is not as crucial as it is for the 'mother' bud; as long as the pollen is fresh it will do the job. Fresh pea pollen is deep yellow and quite moist-looking. If it's pale and dusty it's past its best. The bud should be mature but not fully open ... the stage where the petals have grown out beyond the green sepals is ideal.
 This is the 'dad', Mr Bethell's Purple Podded with the keel slit open to access the fresh pollen. This bud is more mature than the 'mother' bud and easier to work with.
Peel back the outer petals to expose the keel and make a small slit in it near the end. If you then poke the end of the scalpel into it (you can also use a paintbrush or a pen top) you should be able to collect as much pollen as you need. If you do it carefully you won't even damage the flower ... it will already have self-pollinated anyway and the pod should still develop as normal.
You're now ready to make the hybrid cross. Go back to the bud you just emasculated and dab the pollen over the stigma. You will see the yellow powder sticking to it if you've got it right. Then close the bud by folding the outer petals back into their original position, covering up the stigma. With most plants it's necessary to seal up (or stick a bag over) the bud to prevent pollen-carrying insects getting inside and spoiling your crosses, but with peas that isn't necessary because the bees aren't interested in them. It's only necessary to lightly close the bud to help prevent the stigma from drying out.
Lastly but most importantly, label the buds you've pollinated. Otherwise they'll end up in your shepherd's pie by mistake, and then you'll be sorry. You don't need anything elaborate. All I did with mine was twist a piece of green pipecleaner around all the buds I pollinated with Mr Bethell's Purple Podded, and tie a piece of brown string around the ones pollinated with Champion of England.
And that's it. It's a lot less complicated than it sounds. The ideal time to do crosses is when the weather is cool, but it's not essential. This morning I did seven hand-pollinations on Alderman buds: five using Mr Bethell's Purple Podded as the pollen father and two using Champion of England. And the results will be thoroughly blogged, even if it turns out to be a total f*** up. :)
3 comments:
Your instructions and pictures are great, but I am still a little lost. I think the female flower thing is above my head. Still, you have encouraged me to give this a go. (one day perhaps) I need to have better success with peas first.
Mary
How did the experiment work out - would love an update. Thanks for the lovely, informative site.
Regards
Jenni L
Rebsie..
I'm trying to get the hang of this hand pollination. I won't know till next year probably if it worked or not. But, it sure is fun trying. I'm gonna use some of your MBPxA as a father to some other peas i have that are half green and half purple.. sorta green with purple splotches on em. I figure with the purple pigment not being expressed as strongly it might make your pods stay red longer.
From your F3's i've got 2 plants so far that have the red pods. And it's too soon to tell on the one plant if it'll last longer... but on the first one.. it started out yellow as you described. Then gradually changed to a nice rich red color.. and now they're working their way towards purple. Really dark maroon anyways. I'll send you some pictures of them later on.
Dave
Post a Comment