
A young TPS seedling ready for a new home. This one is from an OP berry of Mayan Gold which I collected in my garden in 2008.
Well, I said I would give further instructions on cultivating potatoes from TPS (true potato seed) once I had some photos from my own crop, so it's about time I got on with it. These tips draw heavily from the videos of Tom Wagner's potato workshop posted on Patrick's blog, so if you want more details I recommend giving those a spin.
Last time I wrote about sowing and growing young seedlings from TPS. Once the seedlings get established, you essentially grow them the same way you would ordinary tuber-grown potatoes … you earth them up as they grow. The only difference is that they are smaller and more delicate than tuber-grown potatoes, at least until they get established, and need to be handled a bit more gently.
The first thing you will probably notice about potato seedlings is that they grow very fast. When they first germinate they're so tiny they almost look like little threads of cotton sticking out of the soil. But it doesn't take long for them to outgrow their seed tray and be elbowing each other for space. They also tend to be a little bit straggly and thin-stemmed (though less so if they've been given plenty of direct sun) and when they reach a couple of inches tall it's time to give them their first transplanting.
Find a container or module thingy deep enough for the whole seedling. That is, the depth of the soil in the seed tray plus the height of the plant. Make a deep well in the centre of the module/pot and drop the seedling into it. Bury the whole plant right up to its neck - stem, leaves and all. Just leave the growing tip and a couple of sets of leaves sticking out at the top.
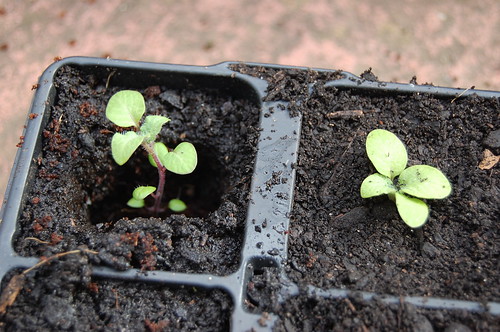
Put the seedling into a deep hole in the compost and bury the stem and lower leaves, submerged up to its tip, like the one on the right.
Once they are potted up they will grow like rockets. The submerged stems will grow little feeder roots which will help the plant grow bigger and better. They are exactly like tomatoes in this respect. They have the additional advantage though that they can also set tubers from these roots ... and earthing them up in this way will increase their tuber production just as conventional potato crops are earthed up for the same reason. When transplanting them, there's no need to remove the lower leaves - just bury them. They're better left in place to wither naturally rather than causing unnecessary injury by pulling them off.
Keep the potted up seedlings well watered in a sunny place for a few more weeks and admire them as they turn into something like this:
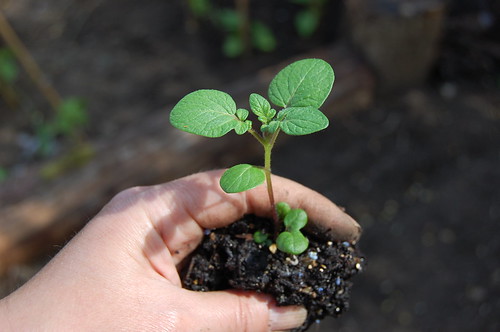
A mature seedling ready to be planted out in the garden. This is a Pirampo x Khuchi Akita F3 plant grown from Tom Wagner's TPS, now starting to look properly potato-like. Ignore all the funny business at the base of the stem ... relics of the fused cotyledons which this plant produced before growing normally.
When there's a good bit of stem growth on the seedlings and all risk of frost is past, harden off the seedlings for a few days and nights and prepare a plot of ground for them. By now they are getting to a point where they can be treated more like tuber-grown potatoes, and you can plant them in the same kind of soil you would use for any other potato crop. Having said that, the lack of a tuber does make them more vulnerable. If a tuber-grown potato haulm is damaged, it usually regrows fairly easily from the tuber, which is full of stored energy and nourishment and capable of compensating for pretty much any degree of human ineptitude. TPS-grown potatoes don't have that backup - they are dependent solely on their youthful root system, which is somewhat fine and tangly. Add a thin and brittle stem into the equation and you have a rather more delicate plant than a normal spud. Even so, it's amazing what they will survive. One of my seedling batches newly planted out this week had a devastating visitation from the Arse of Doom, which left evil deposits followed by a savage ground raking in which several plants were damaged. I was pretty surprised to find that baby plants reduced to mangled muddy stumps with all their leaves ripped off were sprouting new green growth within two days. Them's tough little chaps.
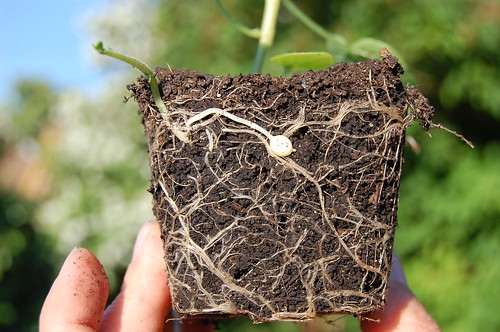
Depending on how mature the plants get by the time you plant them out, you may find tiny tubers already forming when you take them out of their pots, as shown on this Carola hybrid above. The tubers form on special chunky roots called stolons. Sometimes you get stolons above soil level with little microspuds on the end, but usually when stolons grow above ground they develop leaf shoots, which is not what you want, so plant them out and get them earthed up. Something else I noticed was a very slight blue-ish tinge in the roots of some of my Salad Blue OP seedlings. I may have imagined that though, I was drinking some Belgian Leffe at the time, and that stuff is like LSD to me.
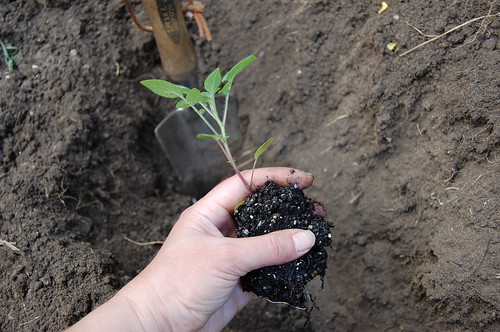
Dig a little trench. Tom recommends a north-south orientation to make the most of the sun passing overhead. Then dig out a hole at the bottom of the trench deep enough to accommodate the whole height of the plant and its rootball. Yes, once again you are going to bury most of the plant right up to its top leaves. The original seed level is going to end up some way underground, which allows lots of stem depth for making extra roots and tubers.
I have been planting my seedlings around 10 inches apart. That's slightly closer than I would with tubers. Plants grown from TPS are not realistically going to produce as big a yield as a tuber-grown crop in their first year (they will make up for it next season) so I squeeze them up a little. Space is at a premium in my garden so I sometimes need to plant things a bit on the close side.
If waterlogging is a problem in your soil, you can plant the seedlings slightly to one side of the trench rather than in the bottom (choose the side where they will get most sun) to ensure the roots aren't sitting in a puddle where they might rot. My soil is sandy and well drained so I don't worry about it.
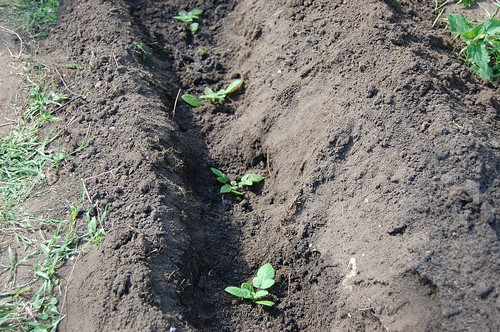
The seedlings planted along the base of the trench, planted deeply with just their growing tips exposed. They will soon grow up and away, and as they do I will be able to fill in the trench to keep them earthed up.
The earthing up process continues as the plants grow. The filling in of the trench is followed by a gradual mounding up, so that you end up with a long hillock around the plants. Just as you would with a conventional potato crop.
Next instalment will be an explanation of hand-crossing potato flowers to make your own TPS. Wahey!
9 comments:
Interesting Rebsie. When I did it last year, for convenience, and because I then didn't have a much gowing room as I have now, with a full allotment, I grew mine in flower buckets. The crop I got from the two best of these are now coming along nicely in rows in the soil.
I'm doing TSP too. I wish I would have saw your trenching before I planted them out. I'm just mounding straw around them. Really hope that some of the varieties I planted produce fruits. I have TSP but then I also have some non-TSP that are known to produce fruits.
It'll be exciting to hear about how they do, Kath.
Happyskunk, the trench method is what Tom recommended but I don't see why you shouldn't get an equally good crop the way you're doing it. As long as they are well mounded up so that the tuber-forming roots have space to develop they should be fine. Do let me know how they turn out!
I enjoy reading your blog so much. Your writing style is friendly and I love your British expressions. I've gone back and begun reading the archived blogs, too. Back to 2007 so far.
You have inspired me--most of my life I've read books about English gardens and always thought I couldn't have one because I live in a very different climate. But one day the thought came to me that, "Yes, I can have the garden of my dreams." It won't be the kind of garden that would flourish in the English climate, but one that will survive in South Dakota, and evoke the kind of feelings I get when I look at pictures of things English.
The descriptions of your cat in the garden make me giggle--I have a pup who "helps" me, too. I dig a hole and put a plant in, cover it up, and next thing I know she's digging it up for me. What fun!
I really like your idea for pre-germinating seeds, and have several zip-lock bags going. It's so enjoyable to SEE when they're ready to plant. Once they've germinated, I can plant them and baby them in the garden for a while until they take hold.
I've been reading about the benefits of indigenous micro-organisms in the soil and intend to try gathering some this year.
Thanks again for your work, and for writing about it. I really enjoy reading your blog.
Marge Comeau
Hi Rebsie,
Just discovered your site and am enjoying the interesting contents very much.
I have just retired and am now starting to have time for some of the growing of our own veggies & interesting experiments that one can perform with plants.
It is hard to imaging how you have time to "Earn a Bob" besides the work you do in the garden and keeping up up your interesting B-log!
I have provided a link as below which might interest you as you are - obviously - very interesting to grow spuds from TPS.
Keep up the "Good Work".
http://www.sharebooks.ca/RaoulRobinson.htm
Potatoes are a rewarding crop to grow. They produce one of the highest yields per area planted of all food crops. And, in addition to vitamin C, they are high in potassium and iron, low in calories, and serve up a good dose of protein, carbohydrates, and fiber.
I never knew there were TPS
amd just found out from Your site.I have now 4 lovely plants growing !!
Your instructions and information has been invaluable for Me.
October 15.. I shall have to put in big pots,I hope this will work
What a great I info! Tq so much for sharing
When should I pick this seed if I want to grow them? I saw mine this morning, purple majesty potato.
Transplanting is a farmer job. We must appreciate their effort. They work from dawn to dusk. Some valuable things must be derived from this content. Now it's time to avail party bus rental fairfax va for more information.
Post a Comment